Pages

Tuesday, June 26, 2012

The Itsy Bitsy Store in New Delhi

Hey happy crafters - we've got FABULOUS news. We opened our store in New Delhi and with one swift motion, craft supplies are at your fingertips. No more hunting in tiny gullies, asking relatives from 'foreign' to bring you goodies or reluctantly accepting what's available. Now you can browse to your hearts content at our delightful store at Paragon Mall, Rajouri Garden.


We've got aisles of papers and cards, streams of embellishments and tools and a devoted corner to die cutting equipment. Not to mention our bead bar - a first of its kind in India - a positive joy for all you jewelry making aficionados!


The inauguration was on Sunday June 11th. Our proprietors Rashmi and Harish Closepet proudly introduced their brainchild to a much loved group of Itsy Bitsy well wishers. We invited prominent Delhi personalities Mrs Rashmi Arora and Mr Vinod Arora to cut the ribbon and before long the store was officially open.

Ribbon cutting by Mrs. Rashmi Arora

From Left to Right: Suresh Closepet, Harish Closepet,
Vinod Arora, Rashmi Arora, Rashmi Closepet

We know you love craft as much as we do so consider this a personal invitation to drop by the Itsy Bitsy Store in New Delhi. If you're in Bangalore, we have 2 stores - in Banashankari and HSR Layout. For those not in these two cities,  all our merchandize is available online at www.itsybitsy.in so happy shopping and happy crafting!


Saturday, June 23, 2012

A Perfect Little Craft Corner

I live in a compact apartment with just about enough space for a 9 month old baby girl, 3 year old hyper toddler boy, overworked blackberry consumed husband and full-time-mom me. So it's no wonder that I don't really have any space dedicated to my hobby - craft. I just have a spare cupboard where all my materials are shoved in using bags, boxes and other makeshift storage options. When I want to work on my projects, everything is brought to the dining table and pretty soon the house looks chaotic.


I am now starting to imagine how truly divine it would be to have a devoted craft corner. A space just for me and my stuff. Where I can peacefully work on my projects during the quiet afternoon hours when both the little monsters are asleep. I began to google the subject and came across some really inviting spaces.

The image at the top of the page for example looks so ideal. She's got a basket for all her papers, ample storage for her embellishments and knick knacks, a big wide table for working and a cute little accent shelf above. The only downside is space. Where can anyone find so much space in their existing homes?


I think this next picture is more me. A tiny compact closet space coverted into a craft corner. Plenty of little boxes for all the accessories and a fairly decent workspace area. I think that's what I'm going to  have to do with my craft cupboard. The best part of course is that the closet can just be closed and locked, safe from the curious fingers of a naughty toddler.


Now this is work area of very serious crafter! Hmmm definitely not for me (my kids would have everything on the floor in 2 seconds) but what's interesting is the storage solutions. Racks for papers, drawer for other materials, table top containers for pens and glues. Wonderful!

To all the crafters out there. What does your craft corner look like? Do you have one? Where do you keep all the oodles and oodles of materials you have? Leave a comment and tell us. 

Wednesday, June 20, 2012

A Scrapbook for a Baby Girl

I am blessed to be the mother of 2 children and wanted to record every bit of their early lives. There are numerous baby books in the market but I found that they required too much information and never provided enough space for photographs. So for both my children I created a scrapbook which I could customize to my specifications. And of course Itsy Bitsy made it possible.

This was the opening page. I found these adorable little baby bodysuit stickers at itsybitsy.in and slipped them in.

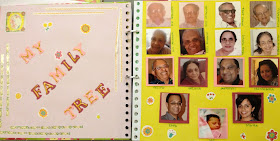
Next was Kyra's family tree. I used a few craft letters touched up with glitter tubes for the left side of the page and found pictures of all the great grand parents and grand parents for the right side.


I devoted the following section to 'Preparing for You'. The fact is we spent so much time and attention to the pre-birth phase, it's only fitting that it finds a place in this scrapbook.


Apart from the names we considered, there were the ultrasound scans, the pictures of a big bellied mama and the baby shower photos. Notice how 'Papa's Thoughts' are quite blank.


Now it was time for the Big Arrival! I wanted the introduction page to be grand and modern. Love the little accents from itsybitsy - stork sticker, birth certificate and baby foot tag sticker.


On to the hospital photos when our precious little Kyra was first introduced to us. Making my own scrapbook allowed me to pack so many photos in.


My scrapbook is still very much a work in progress. I have oodles more to do and pictures to add. Not to mention pages to include and details to jot down. But all in all it is a labour of love, one that gives me great pleasure and satisfaction.


Have you put together a scrapbook for your child? We'd love to see it. Leave a link or comment below to tell us more.

Wednesday, June 13, 2012

Make Daddy Feel Special This Fathers' Day

I have a 3 year old boy and any mother of an adrenalin rushed toddler would agree - keeping the kids busy is no mean feat. So with Father's Day around the corner an after-school craft project for Papa would be perfect timepass.

We decided on making a Jigsaw Puzzle in a box.  On Fathers Day, Dhruvy would present Papa the box and help him put the pieces together to reveal a special message. Thankfully I have a pretty decent stash of craft materials from Itsy Bitsy so here's what we used.


We started with painting the puzzle pieces green. My little monster loves to get his hands dirty with paint and goo so that was fun. We left it to dry as we began work on the box.


Next I studied my craft book to figure out how to create the box and found a template that looked easy enough. I folded and Dhruv glued and pretty soon the box was done.


We now needed to embellish the box. Dhruv set to work punching stars into the paper using a super cute craft punch from Itsy Bitsy. Then he placed some fruit stickers, once again from Itsy Bitsy on the lid. It looked pretty cool, our little box.


Our green puzzle pieces were dry and it was now time to paint the special message. This I had to do myself as our little man was still early on in the reading and writing timeline.


Once the paint dried, we dismantled the puzzle and placed the pieces in the box. Dhruv really likes working with pipe cleaners so we twisted a one into a spiral to add to the box decoration.


Voila! We were done! Now the only challenge was to get him to wait 6 days before showing it to Papa!!! Arghhh!

We would love to see your children's craft creations for Fathers Day. Anything is welcome as long as you use at least 2 products from Itsy Bitsy. Contest closes midnight, Sunday June 24th 2012 and two lucky winners will get gift vouchers worth Rs. 500 from Itsy Bitsy.


Thursday, June 7, 2012

The Itsy Bitsy Bead Bar - A Bead Revolution

For all you craft aficionados looking for jewelry and scrapbooking accessories, look no further. Itsy Bitsy has come out with a truly revolutionary approach to bead sales. No longer are you forced to buy set quantities, nor are you dependent on a counter salesman displaying choices at his discretion. No! Now you can examine, view and choose at leisure the beads you want at the quantities you need.


Stop by one of the Itsy Bitsy stores in Bangalore and very shortly in Delhi and you will see what I mean - The Itsy Bitsy Bead Bar, a first of its kind in India. It's a devoted section with an assortment of exotic glass beads, ceramic beads, resin beads, Kashmiri handmade beads, terracotta beads, silver plated metal beads , alpha beads and pendants. All the options are available right in front of you in baskets allowing you to  browse with ease, choose freely and pick up as many or as little as you like. The beads are sold by the gram, not by 'packet of pre-defined numbers'. The cost is Rs. 2 per gram with a minimum purchase of 10 grams.


So the next time you're thinking about embellishing a garment, or creating a one of a kind accessory, you know where you source your materials - The Itsy Bitsy Stores at HSR Layout, Banashankari and very shortly at Rajouri Garden New Delhi. All our products are also available at our online store - www.itsybitsy.in

Monday, June 4, 2012

Card Making Never Got Easier!

I am not an expert crafter and can call myself a novice at best. I am often times at a complete loss when I see the wide range of craft supplies out there. So when I had the opportunity to sit down with a pro from Itsy Bitsy, I grabbed it. Card Making was the order of the day and I continue to be amazed at how a simple hand made paper card can be transformed into a truly exquisite creation using a few accents and embellishments.


Materials Used for the Card Making Project

I am happy to say that you don't need to spend a fortune obtaining supplies for a single card. Just a few accents to add personality and dimension to the card.


Putting Together the Card

Imagination and creativity go hand in hand. We wanted something intricate, complex and pretty all at once. We started with a simple Handmade Paper Card and glued some Retroglam Glitter Paper on it. 

Then to add a delicate girly look, we glued on Ornate Chipboard Borders on the top and bottom. Chipboard borders - didn't know what those were but now they are my new best friend.


The next step was a space for the sentiment. For this we used another piece of handmade card, held in place by some double sided tape. I find double sided tape is a great way to add dimension to an otherwise single layer card.

An Embossed Tag was used for the sentiment and to add a little more oomph, it was placed on a piece of card, embellished with a gentle rouge border. The border was creativity at its best! Our craftsman dipped a tissue on a pink Ink Stamp Pad and dabbed it around the card. Voila!

The card was almost ready. It was time for some detailing. Using some exquisite craft flowers from Itsy Bitsy's new Symphony Flowers range, we created texture and style to the project. We used Itsy Bitsy Scrapbooking Glue and I have to say, it really binds everything perfectly

Passion flowers on the corners and daisies on side were the ideal accents. These flowers not only looked realistic, they felt that way too. I wouldn't have stopped had it not been for the expert crafter by my side who reminded me that too much would be exactly that - Too Much!


A few pearl stickers to add some polish and the craft project was complete. Wow! Haven't seen anything like this before and can't wait to get started on a project of my own.