Pages

Thursday, October 31, 2013

Happy Halloween!!! Fun and Easy Kids Costumes


Today is Halloween so Happy Halloween folks! Here in India, we don't celebrate it much but we are aware how big it is overseas and the heat is catching on. Of course the key ingredient is the costume so I decided to get a bit crafty with it.


I found this fabulous idea on Spoonful.com which not only provided the steps but also included a super template. I added a few tweaks here and there. For example, I replaced the red and black felt with card stock - far easier to find and work with. I also replaced the hat containing the antennae with a hairband containing the antennae. The black circles were cut using a circle framelit die - the biggest size and some broad satin ribbon kept the wings in place. 


And here's my little girl Kyra modelling her ladybug antennae. Isn't she looking precious! She is becoming quite a pro showing off my craft projects for Itsy Bitsy - check out more projects for Kyra here and here

Did you try making a costume this Halloween? Leave a comment and let me know. Would LOVE to hear from you! Till then Happy Crafting!!

Supplies Used

Monday, October 28, 2013

Calvin & Hobbes Wall Art for a Fun Kid's Room!


As you know, ItsyBitsy is a Hobby and Craft Supplies MEGASTORE so if your hobby extends to art and painting, then this is your definitive destination for all things arty! So when I wanted some wall art for my kids' room, I figured I'd best do it myself and with ItsyBitsy around, it was easy peasy!


The MontMart range at ItsyBitsy is extraordinary! You've got literally EVERYTHING - from brush sets, to paints, to mediums, to canvases to easels. I decided to go with acrylic paints on a canvas background so everything you see here is painted as such.


I know what you're thinking - 'wow, Sunehra's an artist' - not quite! My mother taught me this fantastic way to draw perfect pictures. It's actually the approach followed in many kids activity books to help them draw but I never did it as a kid and I am seeing it's benefits only now.
  1. First, I find a picture online that suits my project. 
  2. I print it out on a piece of paper.
  3. With a pencil and ruler, I create a grid of 12 squares on this printout encompassing the entire picture. 
  4. Then I create a similar grid of 12 squares on my canvas with a pencil.
  5. I then attempt to copy the picture by using the grid as a guide.
  6. Once I'm done, I erase the grid lines from the canvas which is not easy so make sure the grid lines are very lightly drawn. 


Once I was done, I went to my local frame shop and got it framed in different colours. They had a great kids range, brightly coloured frames - perfect for my creations. 

What do you think of my wall art? Have you tried anything for your home? Would love to see. Leave a comment with a link and I'll be sure to pop by!

Supplies Used

Thursday, October 24, 2013

Diwali Cards with Stencils and a Video Tutorial


It's a happy and festive time of year! Diwali! North, South, East or West, all over India, everyone is happy during Diwali! Whether it's the sweets, or the gifts or the new clothes or family time or my personal favourite - teen patti - everyone loves Diwali! ItsyBitsy loves Diwali too! They've got a range of really fabulous Diwali Stencils, designed to help you make professional, thematic and very stylish Diwali cards.


For this card, I used the Diwali Flower Pot part of the stencil along with embossing powder and a heat gun to create this fabulous focal feature. There is just one flower pot in the stencil but I just replicated the design 3 times. Love this card not just because of how it turned out but also because flower pots are my favourite crackers. No noise, only pretty lights! To see how I created this effect, don't miss the video tutorial at the end of this post. 


For my second card, I used the Diya stencil with some alcohol markers. I used the stencil as a guide and with a marker outlined the entire drawing. Then I moved the stencil aside and coloured it. As a final touch, I used an ink pad to edge the sides with orange ink. Again, a video of how I did this is at the end of this post. 


Finally a Diwali Lantern Card. This time I used an ink pad with the stencil to create the design and then fussy cut the shape so that it would be a stand-alone embellishment. Isn't that fun! And here's the much awaited tutorial.


How do you like my Diwali Cards! Aren't they bright and festive? Have you been crafting for Diwali? Would love to see your creations. Leave a comment and I'll be popping over very soon! Till then Happy Diwali!

Supplies Used:

Monday, October 21, 2013

Winners of the Itsy Bitsy Pretty P Challenge

Folks! We are here with the winners and finalists for the ItsyBitsy Pretty P Challenge. This time we changed the methodology a bit. We invited all your fabulous entries and then opened the gallery to audience votes. The judges made their choices after considering the audience feedback as well as the number of Ps that were incorporated in the project. Bear in mind that audience feedback was not the sole deciding factor, it was used to help choose a winner.

So without any further delay, here are your winners folks! For Paper Crafting, it's Ayushi for this gorgeous and extremely girly layout! Love the quilled flowers and love that all 4 P's were incorporated in the project.
And for Jewellery Making, it's Berina for this stunning Crystal Set! Berina incorporated 3 of the 4 Ps and also garnered up a lot of audience support for it! Well Done!!!


Here are the Finalists for Paper Crafting in no Particular Order

Sathya for this awesome mosaic design card


 Kaija for this mesmerising creation 


Charu for this perfection of Shabby Chic

Riti for this outstanding star album! Love the bloom! 


And Shilpi for this intricate frame


Here are the Finalists for Jewellery Making in no Particular Order. Since there were only 17 entries, we have chosen just 3 finalists.

 Radhika for this Quilled Chandbali Set


Anuja for this highly original ear cuff earring

Parimala for this bold and bright quilled set


Well done winners and finalists! You all have created masterpieces for us and I am sure you will be delighted with your accomplishments! We encourage all our participants to strive for originality and uniqueness in your creations. Those are really the projects that catch our eyes and will be rewarded. 

Winners, please write in to info@itsybitsy.in to claim your voucher and winners badge. Finalists please write in to info@itsybitsy.in to claim your finalist badge.

Hope you all are participating in the current challenge - Anything Goes with ItsyBitsy. Looking forward to seeing your entries. Till then, join me in congratulating all the winners and finalists for their amazing creations! Well done and Happy Crafting!!

Saturday, October 19, 2013

Floral Hairbands for your Little Princess with a VIDEO TUTORIAL


As some of you may know, I have 2 little children. My son Dhruv is 4 and my daughter Kyra is 2. When I was expecting Kyra, I was really hoping for a little girl, one that I could doll up with pretty dresses, hair accessories and shoes. I was thrilled when she was born and began the dolling up almost instantly. But it is only now, when her hair has really grown long that I can devote my time to her hair accessories. I once did some hair clips using ItsyBitsy supplies which you can see here. This time I decided to make a hairband full of ItsyBitsy blooms and here's how it turned out. 


I started with a regular plastic store bought hairband which I then proceeded to wrap in floral tape from ItsyBitsy. Floral tape has this excellent property, it's sticky enough to stick to itself but generally not sticky, perfect for these kind of projects. My daughter has this lovely pink and blue dress that her grandmother bought her. I decided my hairband was going to be for that dress. After the floral tape, I  pretty much just glued down all the roses in a line and added some ribbon as a final touch. Here's a closeup.


 To see how I did it step by step, here's a video tutorial for you!


And here's little Kyra modelling the hairband. Like most little girls, she LOVES to dress up so she gladly put on the dress, happily let me brush her hair and was thrilled to have the hairband as a matching accessory. As you can see from the photos below, she was happy to pose for photos too!!


What do you think of my floral headband project? Do you think you would like to do something like this for your little girl? Leave a comment and let me know. Would love to hear from you!

Supplies Used

Thursday, October 17, 2013

A Travel Scrapbook Album Packed with Photos!

I'm still in the process of putting together my holiday scrapbook album. If you want to see the first post which is the cover and binding method, click here. Now I will be sharing some of the pages of the inside of the album. Each page is dedicated to a different country that we visited and the 2 pages I am showcasing here are of Italy and Greece. 


So as you can see from the picture above, this is the Italy page. The base paper is a lovely gold theme from the DCWV Tradewinds stack. I found an extremely apt Embossed Tag titled Good Times which is perfect for journaling. I added chipboard alphabets which are heat embossed gold as the title. For the city name, I used Chipboard Lasercuts again embossed gold as the base and on it I glued  the name of city using my new favourite die - the Sizzix Doodle with Dazzle die. It's got all letters of the alphabet in upper and lower case and it has a pretty dangling star at the bottom of each letter, giving the dazzle effect. Here are some closeups.


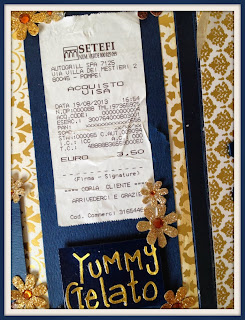
I guess the best thing about this alphabet die is that you snip off the stars when you want something simple and straightforward. I had preserved lots of tokens from the trip and this one is a receipt for ice-cream - yummy gelato - that I went nuts on during the trip. To see the Doodle with Dazzle Die in action, check out this video tutorial!


I used the Spellbinders Fleur De Lis Borderabilities Die to frame each of the photo spaces which are all flaps allowing 3 photographs on a single space. So this page will accommodate 9 photos of Pisa.


My next page was the section devoted to Greece. In Greece we visited 2 places - Mykonos and Athens.  The top layer is for Mykonos and the inside flap is for Athens. Since Mykonos is a beach town so I used some net with shells to create the theme. The shell embellishments continued all over the Mykonos page to complete the seaside feel. Each of the phtotos are framed by a Scallop Rectangle die cut offering a pretty frill to all photos. Again this page can hold 11 photos of Mykonos. 


My Cruise Scrapbook Album is going to take a few more days to complete, 3 more countries to include and so many photos to print in different sizes. But I have to say, I am really enjoying it. I never tried this before and it truly is a pleasure to preserve all one's memories so craftily!

How do you like my album? Leave a comment and let me know! Would love to hear from you!

Supplies Used

Tuesday, October 15, 2013

The Anything Goes with ItsyBitsy Challenge

Folks, it's the 15th of the month and time for a brand new challenge here at ItsyBitsy. As you know ItsyBitsy is India's number one Hobby and Craft Supplies Megastore and we have literally over 15000 products to choose from. So your challenge this month is to create anything you like as long as it includes a product from ItsyBitsy. The challenge name is 'Anything Goes with ItsyBitsy because with ItsyBitsy, you can make almost anything!!! As always there will be two categories - Jewellery Making and Paper Crafting. 

And to get you started, here is some inspiration! For Paper Crafting, I created a gift set. I have to say I was extremely inspired by the submissions of last month's challenge. Mansi made a beautiful set which inspired me to make one. And Sathya created this fabulous mosaic design card which again inspired my project. Nothing gets me more excited than great new ideas and you ladies got me crafting like crazy!!


My set begins with a card inspired by the Mosaic design I mentioned earlier. I used a sheet from the DCWV Luxury Stack and cut it into little 1" by 1" squares. Then I used 2 Intricutz dies - one a flourish and one a rose to create that pretty white ornate design on top. I finished with some ItsyBitsy vintage roses, ribbon and beads. This card set the tone for my set. 


The next project was a coordinating gift box. I used the same mosaic design to start and added the same die cuts albeit at different locations creating a different layout. The flowers and beads continued here and the DCWV Luxury stack paper continued the colour scheme. 


Finally it was time for the gift bag with a matching tag. Here the beads became the bag handle so both the bag and the tag and devoid of beads. For some relief from the Mosaic style, I made the tag with a simple overlay of pattern paper from the same stack while the die cuts and the flowers continued the theme. 


Now on to the Jewellery Making Inspiration. Our team at ItsyBitsy really went all out to showcase our fabulous product range with this one. 


All the beads are terracotta and they have been painted using our artist acrylic colours. Isn't it just stunning!! Now that's sure to get you crafting!

Rules of the challenge:
  1. For the Paper/ General crafting project, your submission can be a card, box, tag, scrapbook layout, dress, embroidery, crochet work etc - anything as long as it is handmade and
  2. contains at least one ItsyBitsy product
  3. For the jewellery making project, your submission must be some form of jewellery and once again must contain at least one ItsyBitsy product
  4. Quilled jewellery or jewellery made out of paper beads will fall under the Jewellery making category.
  5. Entries can be submitted until 10th November 2013.
  6. Entries will be open to audience vote from 11th to 14th November 2013
  7. Following this, the winners will be selected after combining both audience feedback and judges feedback.
  8. In order to submit your entry, click on the inlinkz button provided at the end of this post, add your image and link to your blog post containing the submission. There is a separate button for each category.
  9. If you do not have a blog, please create an album on any online photo gallery, ensure the settings are public and link it up as detailed in point 5. 
  10. Each participant can submit a maximum of 3 entries within each category.
  11. Submitting old projects is not permitted. All submissions have to be created after 15th October 2013
  12. In your blog post, create a link back to this page - The Anything Goes with ItsyBitsy Challenge.
  13. Entries are welcome from all over the world however if you are the winner, we can only ship your prize to an Indian address.
  14. 2 winners will be selected, one for jewellery making and one for paper/general crafting who will each receive a voucher of Rs. 1000 each, redeemable online at 
  15. In addition 3 to 6 finalists in each category will be selected all of whom will receive a badge to display on their blog.
Submissions for Paper Crafting


Submissions for Jewellery Making


Supplies Used

Sunday, October 13, 2013

The Latest ItsyBitsy Store in Lajpat Nagar, New Delhi

If you're in New Delhi you will be happy to know that ItsyBitsy opened its latest store in Lajpat Nagar last weekend. It was an exciting day for the ItsyBitsy family as we extended out chain to six stores in India. Crafters, well-wishers, friends and shoppers all dropped by to explore our aisles of craft, to say hello and to enjoy fabulous discounts!!


As with all our stores the Lajpat Nagar store has a fabulous bead bar with a fabulous range of beads enough to delight any jewellery maker. The best part about the bead bar is that you can buy as many or as little as you like of each design, you pay by the gram. You can touch, feel, examine and explore on your own terms as you browse through the unending trays of beads!!!


As with most of our stores, the Lajpat Nagar branch has a fabulous little demo station intended to show how die cutting machines work, foam cutters slice and other nifty tools work. Sunita Tandon, well known crafter was kind enough to run the demos which were a massive hit with the visitors!


And how about our range of papers and card stock. Each displayed in our massive racks allowing crafters to scan through all the options and choose the ones they need.


The Lajpat Nagar store will continue to be on sale for one more week so if you're in New Delhi you really should stop by to stock up on your favourite craft supplies at your favourite craft store - ItsyBitsy!!!