Pages

Tuesday, August 30, 2016

The Metallic Sheen!!

Hi Lekha here with you to celebrate 9 awesome years of Itsy Bitsy ....lets paint the world in metallic sheen!
And you guessed it right...today I will be sharing with you some projects using metallic paints. I used these for the first time and got bowled over by the outcome..these are must haves if you love painting or mix media.
Lets get rolling..
My DT kit this time is all about canvas, paints-some very pretty metallic colors,stencils(if you don't know I have a fetish for collecting stencils and hoarding them !!) and chip boards.
Today I would be sharing three projects with you using these mini canvas.

Lets start begin our colorful journey...

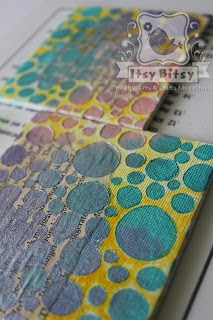
For the first project..I start gluing down papers from a old book on to the  4x4 inch mini canvas using scrapbooking glue.


Next took stencil brushteal metallic paint, blush metallic paint and irregular dots stencil. I have in past used sponge with stencils, brushes-flat and round but the round stencil brush is definitely a must have if you are a stenciling addict like me. These give beautiful outcome.

Don't forget to miss the sheen these metallic colors have..


Have also put in some velvet night metallic paint ...


and here is what we get..


Next used modelling paste with the stencil..I love this bubble texture for the background..Next is "Quilling Time". I have created this background as base for the quilling flowers..and for the first time tried Itsy Bitsy's vellum quilling strips and loved these strips..


These are the vellum quilling strips and come in some very pretty colors

For the flowers I have made fringe flowers (cutting fringes in 1 cm wide paper strip and than rolling it over the slotted quilling tool). Another is the famous Malaysian flower..and my personal favorite of all times.
 The sentiments "beautiful" and "dream" are stamped in permanent ink along with other stamped images which come from the Itsy Bitsy's hope and smile stamp set. This stamp set has great collection of all time use sentiments and images.


Here is the complete look..i have stuck two 4x4 inch mini canvas on to a wooden chipboard piece(and this comes from an old wedding card!!) using the super strong silicon glue and than worked around my way with quilled flowers.

Over to my next project ..these both are mini fridge magnets. 
Painted the base with these metallic paint and round brush.
Also before working any further I stuck magnetic sheet at the back,


and stamped the sentiment from the Itsy Bitsy's hope and smile stamp set


These metallic paints are even great to use with chip board designs design.


I have used combing technique for the leaves  and made Malaysian flowers and fringe flower.


Here is the completed mini magnet.


For the third canvas design, I have painted the background with metallic paints and used dimensional tape to adhere the painted circle chipboard design with wooden alphabets for the sentiment and painted them in gold. Stamped the flowers with black permanent ink.And golden rhinesotnes complete the look..


Hope you liked the colorful twist...
Would love to hear from you..do leave some love in the comments..
happy crafting!!
Lekha


Supplies used:


Thursday, August 25, 2016

Crafter In The Spotlight 12 - Itsy Bitsy

Hello friends!! Itsy Bitsy brings you "CRAFTER IN THE SPOTLIGHT" – a unique way of encouraging and appreciating the talented crafters. We recognize talented crafters week after week, turn the spotlight on them & feature them in our "CRAFTER IN THE SPOTLIGHT"! We love what you talented crafters create & are amazed at each of your unique creations every single day! We love the way you use Itsy Bitsy products & give life to those products.

I am delighted to announce this week’s Crafter In the Spotlight – August 2016 “RUCHI GUPTA”! With a Post graduation in History, a Business Management degree & experience in HR, this experienced crafter started crafting at a very young age! The very versatile Ruchi, who says :) Creativity is in her genes, has tried her hands at Sewing, Knitting, Tatting, Embroidery but her current favourite is Paper Crafting & teaching Craft. :-)
This extremely methodical crafter who doesn’t like any mess, has a meticulous & organised studio, plans her day very well & manages to craft & teach 5-6 hrs every single day! Wow, Way to go Ruchi :-) 


What would Ruchi Gupta do if she had magical powers? To know more about her very interesting journey & her favourite all time quote, please read her very interesting interview. CONGRATULATIONS Ruchi Gupta ! Wishing you loads of success on your creative Journey!

Here are excerpts of my interview with Ruchi:

Rashmi Closepet, MD, Itsy Bitsy : Tell us a bit about yourself & your background?
Ruchi Gupta : I am 49 yrs old. I am a postgraduate in history from Delhi University (graduation from St. Stephens College) and also have a Business management degree. I have seven yrs industry experience as HR manager. All this took a backseat when I got married and household responsibilities demanded my time and energy. I presently reside in Delhi but belong to UP, although all my life, I have lived at various places all over India and for a short period of time was abroad and travelled to Latin America, Caribbean and America. I am mother to two lovely boys now in their senior school. 

RCHow did you get into crafting?
RGCreativity has been passed on to me through my genes as my mother is very creative person and was always doing something with her hands. She is an avid crocheter and always encouraged myself and my twin sister to learn new skills in our summer break. My crafting journey began at a young age of 14-15 as I started learning and participating in activities related to paper craft, sewing, knitting, tatting, embroidery and anything new that caught my fancy.

RCWhat is your favourite type of craft?
RGMy favorite medium and type of craft is paper craft. I love to make flowers with crepe paper and decorations for family weddings are always my responsibility. I also love making mixed media canvases, decoupage and making art journals. 

RCWhat are your favourite products at Itsy Bitsy?
RGMy favorite products to buy at Itsy Bitsy are always all the variety of papers and the special papers you introduce .Like to use more of the handmade papers rather than paper stacks. Also Mont Marte products like texture paste, gesso and brushes are always on my list. 

RCWhat products from Itsy Bitsy do you think are must have’s for a crafter?
RGMust haves from your stores are again papers, felt sheets, art supplies and silicon glue.

RCWhat product would you like to see at Itsy Bitsy?
RGWould like to see more of cutting dies. 

RCYou draw inspiration from?
RGI draw my inspiration from nature and I am particularly drawn to the colors of flowers. Most of my works usually feature flowers or elements from nature. 

RCWhat are your other interests?
RGCrafting is all encompassing and I devote around 5-6 hrs daily for it. But I love to socialize and make friends and love to read. 

RCIf you had magic powers, how would you contribute to the Crafting world?
RGIf I had magic powers, I would love to transform all waste articles into things of beauty and create a society where skills of your hands and appreciation of arts are taught to everyone. 

RCYour prized possession in your craft stash?
RGMy prized possession in my stash has to be my satin papers from your store which I conserve and use in very special projects.

RCHow would you describe your style of crafting?
RGMy style of crafting is very methodical and neat. Crisp lines and bold colors are something which I try to include in my work. I try and master any new technique that I come across before moving to a new one. 

RCHow do you organize your time for crafting?
RGI have my own roof top studio. I usually finish household duties by 11am and very day spent good 4-5hrs in my studio crafting/teaching.
  
RCTips for people who want to craft?
RGMy tip to all crafters and beginners is to not overthink and just begin creating start. The more work you do, the more ideas you get .Also with each attempt you learn from your mistakes and the next project turns out better. You do not need lot of supplies, you do not need space but just a passion to create will carry you through.

RCYour all -time favourite quote?
RGQuote I like : creativity takes courage.
One of my mantras in life is to learn a new skill each year. So I have diligently learned for past 25 yrs and continue to enhance my skill set even now. There is no limit to learning and age is just a number to me.

Here are a couple of Ruchi's awesome creations :


Many congrats Ruchi for being the CRAFTER IN THE SPOTLIGHT – ITSY BITSY :-) :-)
You will receive Rs 500/- Itsy Bitsy gift voucher :-) :-) & a Crafter in the Spotlight badge, which can be proudly displayed on the side bar of your blog and other platforms.
Also, visit our Youtube channel to view & to know more about this crafter – https://www.youtube.com/watch?v=OnLDLSHrOkA
Looking forward to many more creations, Happy Crafting!


Tuesday, August 23, 2016

Dual-fold Photo Frame

Fellow Crafters,

Over ages, Canvas boards has become synonymous with paintings. Right? Lets think out of the box, step aside for a while, away from "general practice" and use it for something different. Today, I have made it into a dual-fold Photo frame
Here below, I would try to narrate on how to transform couple of canvas boards into a Dual-fold Photo Frame.

Step 1

Take two  Mont Marte Canvas Boards measuring 4 x 4 inch.


Measure 1.5 cm from the side and 2.5 cm from the top and bottom.  Punch 2 holes at the intersecting point using We R Memory Keepers Crop-A-Dile. I have started to enjoy using this We R Memory Keepers Crop-A-Dile on any substrate I put my hands on - really am in love with it. Punching through Canvas can be a bit scary, be rest assured it punches even canvas boards :)


Step 2

Stamped Script text Stamp on the Canvas using Versa Colour pigment Ink Pad - Brown . Pigment inks will stay wet for a long time, hence need to be patient with it till it dries up. You can also use heating tool if you are a bit impatient like me. Once the Pigment Ink dries, gave a texture with Mont Marte Dimension Paint -Green using chipboard piece and using its edge to dab the paint around.

NB: Itsy Bitsy has launched real pretty Stamps. Worth collecting all of them ! 


Till this dries up, let's prep up the chipboard embellishments. I love to give a dimension to the embellishment. Gave a coat of Mont Marte Dimension paint on Square Deco Frame chipboardI wanted a black shade, but not true Black. So first a coat of Green and Blue mixed together over it. The dimension paint from Mont Marte gives a dimension to the chipboard surface which I love.


Step 3

Place this frame on the canvas on an elevation. Yes! You heard it right - we are going 3D. This elevation is made so that some keepsake can be kept in it. I cut 4 pieces of chipboard (measuring the length and breadth of frame), placed it around the edges of the frame and stuck it to the canvas. Before sticking , I cut a small piece of pattern paper which became my base. This paper stack has lovely paper collection. Do have a look into it .

Step 4


For the second canvas, Chose a pattern paper with blue shades. Made a frame by cutting out a square from the center. Glued it on 3 sides so that you can slide photos from the top.

Step 5

Now we decorate it with canvas flowers. These Flowers are so pretty that it was really hard for me to use it up. But now my frames were looking even more lovely.

Step 6

To make this to stand and fold up , tie ribbons through the eyelets punched. To add more interest to the elevated frame, I put micro beads(red) randomly on to the sides.

Hope you all enjoyed this tutorial.

Materials used :

Mont Marte Canvas Board

Square Deco Frame chipboard
Script text Stamp 
Pattern Paper
Versa Colour pigment Ink Pad - Brown
Heating tool 
Mont Marte Dimensional paint  : Green and Blue
Canvas flowers
Micro beads(red)
and ....  We R Memory Keepers Crop-A-Dile

Love
Remya

To check my previous blog posts with Itsy Bitsy - click here

Saturday, August 20, 2016

Flip stand Photo album


Hello friends , 

 It is CELEBRATION time as Itsy Bitsy turns 9 , 
Do participate in our ongoing giveaways at the Facebook Group and the Page as well ! 


With so much celebrations going on I decided to make something cheerful and here is my project 


Flip Stand Album on Birthday Theme


I was all excited to receive these papers from Birthday Wishes 12x12 inch Stack Pack as part of my DT Kit. The Birthday Wishes collection is one of those collections that just makes me happy! I love the colors, the theme, and I have found it to be perfect for everything from creating scrapbook pages to birthday party decor. Today, I’m sharing a project that was inspired by chalkboard birthday messages patterned paper in the Birthday Wishes collection


I began with setting the papers of my choice as a part of this flip album  over the Black card stocks 


Dimensions:

1st Page: 4 x 8"
2nd Page: 6 x 8"
3rd Page: 8 x 8"
4th Page:  10 x 8"
5th Page: 12 x 8"

Back Cover: 12 x 8"


The flip stand is made with 2 chipboards covered with Black paper and decorated with washi tape


I have used  We R Memory keepers  Dies And Stamps Happy set  to add the wordings for each layout 


Close up of the words stamped die cut and adhered 


Here is a close view of the Front cover , I have made a chipboard shaker frame to go with the theme 


I have made cutouts of the Pattern paper and used them as sentiments and wording all over .


Here is how I have decorated each page of the flip stand album with Foil stickers 

Image courtesy - Google  


Image courtesy - Google  


Image courtesy - Google  


Image courtesy - Google 

Products used to make this project


SILICON LIQUID GLUE


Do check my earlier creations on stamping  Here at the Itsy Bitsy Blog

This is all for today…. I love to hear from you & truly appreciate your feedback.

Have a crafty day!