Showing posts with label Pipe Cleaners. Show all posts

Tuesday, November 24, 2015

Surprised Frog!

A very Happy Tuesday to all! Today we are going to make a cute little frog for our little friends! It's an easy to make and fun pompom project. Pompoms are such versatile little things, cute, colourful and full of fun! Combine them with chenille sticks, craft sticks, thermocol balls and google eyes and you are looking at endless fun opportunities. Today we are going to make a cute frog which looks kind of surprised. Imagine the stories one could tell with this froggie as a puppet!


Supplies required to make this frog:


Pom Poms: 4 (1 – 40 cm, 1 – 30cm, 2 – 15cm)
Google Eyes- 1 pair
Felt – Green, Purple, Red

     Cut out the lily pad and the mouth from green felt. Cut the Webbed feet from purple felt and tongue from the red felt.


Loop and twist the Chenille stem in the middle to make a “8” shape.


Shape the loops to resemble frogs legs. 

Glue the webbed feet on the lily pad with silicon glue. 
Glue the legs (hold for a while to let the glue dry a little)


Stick the 40 cm pompom and then the 30 cm pompom to make the body.

Stick the two smallest pompoms to make the base for eyes.

Stick the google eyes.

Your awesome frog is ready to play! Experiment with different colours and sizes of pompoms and see what you can come up with. Happy Crafting :)


Monday, August 31, 2015

Majestic Lion


Hello everyone! Welcome to another Itsy Bitsy Tutorial.

Today we are going to learn how to make this Majestic Lion! Don’t worry about his ferocious looks, he is a friendly one, and easy to put together especially with our step by step tutorial. It’s also a fun way for parents to add a creative activity to their fun time with kids.


This craft uses a thermocole ball as base and chenille sticks for the mane. Thermocole balls are one of the most versatile craft supplies. There are many things you can make using these balls, a flower ball, glitter balls, cute animals, a solar system model or Christmas ornaments. Kids just love them!

For making this Lion you will need the following supplies:
Orange Bumpy Chenille sticks
Yellow Bumpy Chenille sticks
Google eyes: 1 pair
Yellow tempera or acrylic paint


Method:
Paint the thermocole ball with yellow paint and let it dry. This will be the head of the lion
Wrap the orange chenille stick around a pencil or your paint brush to curl it. Repeat for all the orange Chenille sticks.
Snip all the curled chenille stems into two pieces. These pieces will form the mane of the lion. 

Apply some silicon glue to one end of the curled chenille stick piece an insert it in the thermocole ball. Insert all the orange chenille stem pieces around the head, as shown.

On one side, push the stems a little closer to the head so that they appear shorter. The side with the larger mane will be the top of the head.

To make the ears, cut the yellow chenille stem to make 3 shapes as shown below. To make the “C” shaped pieces, twist and join two bumps together. One of the “C” should be slightly bigger than the other.

Insert the yellow pieces to make the ears; first the single bump, then the smaller “C” shape around it and then the largest “C” shape. Make sure to insert the ears on the side with the larger mane. Stick the google eyes.

Twist the black chenille stem as shown, trim it and shape it to form the nose and mouth.

Stick the mouth and nose. 

Your Majestic Lion is ready! 

Please let us know what do you think of the tutorial and do send us picture on our Facebook page if you try it,
Happy Crafting!

Chenille sticks :
 http://www.itsybitsy.in/store/index.php?main_page=index&cPath=4200_4209

Thermocole balls: 
http://www.itsybitsy.in/store/index.php?main_page=index&cPath=4200_4212

Google eyes: 
http://www.itsybitsy.in/store/index.php?main_page=index&cPath=4200_4206

Yellow tempera or acrylic paint: 
http://www.itsybitsy.in/store/index.php?main_page=index&cPath=1100_1101

Paintbrush : 
http://www.itsybitsy.in/store/index.php?main_page=index&cPath=1100_1107
Silicon Glue: 
http://www.itsybitsy.in/store/adhesives/silicon-glue

Tuesday, June 2, 2015

A Cute Merino Sheep


Hello Crafters! Today we are going to show you an easy but fun craft project. These easy and simple crafts are great to initiate kids into the creative world of crafts! We try to make these tutorial very detailed so that young children can also follow them easily. Thermocol balls, pompoms and chenille sticks are very versatile crafting materials and there are hundreds of possibilities. Today we are going to make a fluffy little sheep J


For this project you will need following supplies:
  1. Thermocol Ball 4cm – 1pc
  2. Black Chenille stem : 1 pc
  3. Black Pompom 1.5cm – 1pc
  4. White Pompom 3cm– 1pc
  5. Google Eyes: 2 pcs
  6. A scrap of black felt
  7. Silicon Glue
  8. Cutting Pliers or Scissors
Method:
Stick the black pompom to the thermocol ball using silicon Glue. stick google eyes to the black pompom
Cut out two ear shaped flaps from the scrap of felt as shown in the picture above. Glue them to the head of the sheep to form ears

Cut chenille stem on 4 equal parts. Shape one end of the chenille stem pieces as per the picture above. This will give hooves to the sheep.

Apply some silicon glue to the other end of the chenille stems and insert them into the thermocol ball as shown to make the legs. The glue once set, will keep the legs stable and chenille stem pieces will not come loose.
Cut up the white pompom to make some fluff.

Apply the glue on the thermocol ball and stick the fluff all around.

 A cute fluffy sheep is ready. Use it for model of a farm or just have fun crafting!


Please let us know what you think of tutorial on our Facebook Page and do send us pictures if you try it.
Happy crafting!


Link for Supplies:
Thermocol Ball:


Tuesday, March 17, 2015

Thermocol Ant


Hello everyone! Its Tuesday and we are back with a fun tutorial. Summer vacations are just around the corner! So, today we thought we will do a simple but fun Kid's Craft project. These easy and simple crafts are great to initiate kids into the creative world of crafts! We try to make these tutorial very detailed so that young children can also follow them easily.
Thermocol balls, pompoms, chenille sticks and google eyes are very versatile crafting materials and there are hundreds of possibilities. Give these supplies and some craft glue to kids and you will be surprised what they can come up with! Today we are going to make a whimsical ant with wings J


Here are the supplies you need for this project:
  1. Thermocol Ball 6cm – 1pc
  2. Thermocol Ball 4cm – 1pc
  3. Chenille stems : 2 pcs
  4. White Pompoms 8mm – 6pcs
  5. Google eyes: 2 pcs
  6. Rhinestone crystal: 1 pc
  7. Ribbon 0.6cm – 20cm
  8. Black tempera paint (Acrylic or water colour will also work)
  9. Paint Brush
  10. A scrap of vellum (optional)
  11. Silicon Glue
  12. Cutting Pliers


Method:
 
Paint both the thermocol balls black using tempera paint. You can also use acrylic paints or water colours.
 
Using Silicon glue, attach both the balls together.
Stick the googly eyes and the rhinestone for the nose.

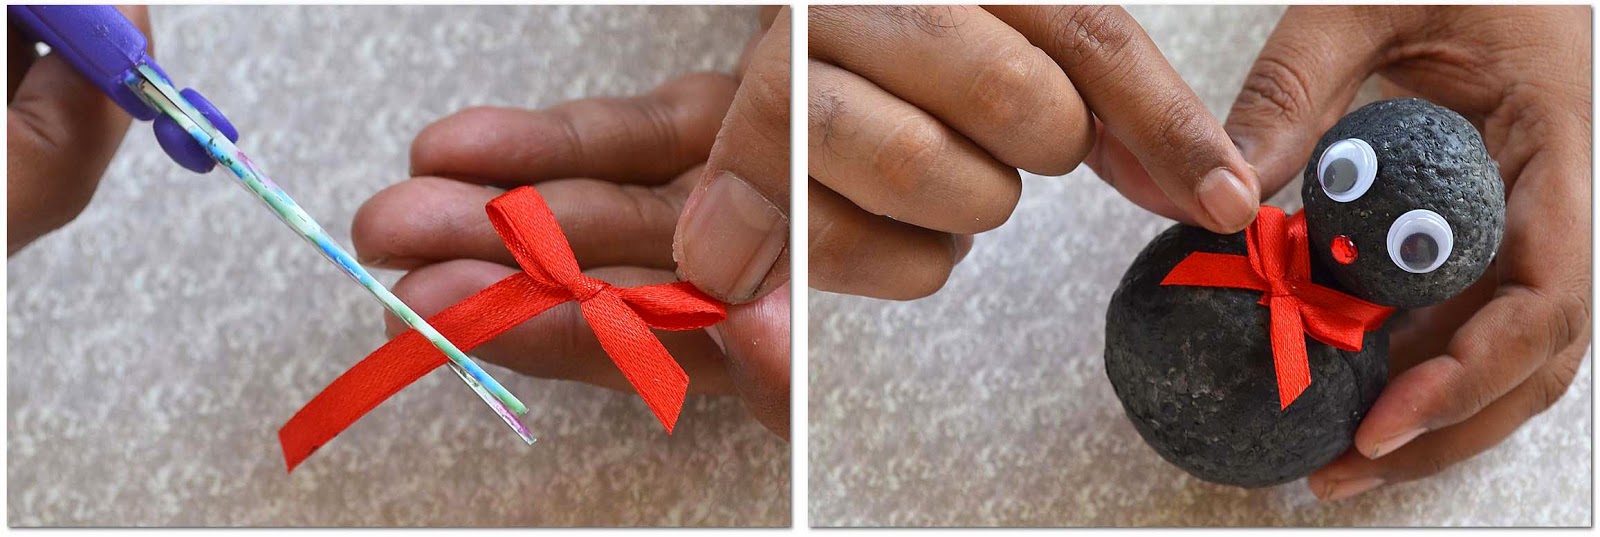
Wrap the ribbon around the neck, cut appropriate length and stick the two ends together.
Make a bow with the remaining ribbon and stick it with glue as shown in the picture above.

Using cutting pliers, cut both the chenille stems in 3 equal parts.
Stick the little pompoms to one end of these chenille stem pieces.
Put some glue at the other end of the chenille stem and insert in the thermocol ball as shown in the picture.
Gently manipulate the stems to get the right shape. Your ant is ready. Continue further if you want to add wings.
Cut the wings out of vellum in desired shape.
Glue the wings to the back as shown in the figure. 
And your cute little ant is ready!

Please leave your feedback in the comments below and do send us pictures on our Facebook Page if you try it.

Happy Crafting!


Links for Supplies: