
Hello there, dear crafty folks!
I am back with more pastel love! An itty bitty mini album inside an altered box. What better way to send sweet nothings to that special someone than a shabby floral box to keep your whispers safe? ;)
Follow along as I go through the process of altering the box and construct the tiny mini album-step by step... with a spine and gusseted pages!

I decided to upcycle a box in which 4x4 photo prints had been delivered.
 1. Select a box. Gauge dimensions. Mine was 4.25 x 4.25 x 1.25 inches on the outside. A quarter inch smaller (all three dimensions) on the inside.
2. Decide on which surfaces to mat. I realized that matting the outside of the base would make it difficult to shut the box. The upper lid could catch on the matting. I decided to mat only the outside of the lid.
3. Choose pattern papers. I picked these peppy, cute patterns from the Little Birdie Pretty in Pink paper pack. I decided to save the shabby romantic rose patterns for my next project. (I did give in eventually and used a bit of the rose pattern.....you'll see!)
4. Pick solid card stock if you want to double mat your box. I love double matting.....it enhances contrast and makes the patterns pop! I picked black IB card stock to mat the lid. The white card stock will be used in building the album. Let me mention here that this is the new white card stock from the store.....it's sturdy and scores smoothly, making it perfect for page builds. I have, in fact, made a card stock album (no chipboard).
Here are pictures of the matting process.
 1. Matted the lid with black cardstock.
2. Matted the lid with pattern paper.
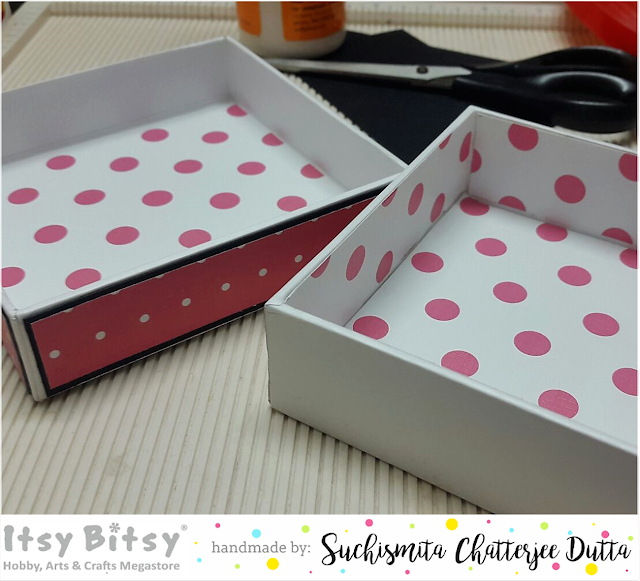
3. Matted the inside of the lid and the base with another pattern paper (no double matting on these.)
Here's how the insides looked after matting...LOVE the polka dots!
Next, prep your chipboard because they may take time to dry.

1. Select chipboard pieces. (I used the heart and the butterfly in this project...the chevrons have to wait for the next project.)
2. Brush them with gesso and go over them again with white acrylic paint for better coverage.
3. Allow them to dry. I do go over then again with glitter glue right at the end...after they are layered under flowers.
I went on to build my mini album next. I like to keep all the decorating for the end (and that is also how I miss shooting that part...sorry!) Anyway...I digress. Here's what I did for the mini album.
 1. I took a 12 x 12 inch sheet of card stock > cut three 3.5 x 12 inch pieces out > trimmed the pieces down to the following dimensions...3.5 x 8, 3.5 x 7.5, and 3.5 x 7.25 inches.
2. This is what I had before starting to score.
3. Scored all three pieces at the 3.5 inch mark on both sides and stacked them one inside the other.
4. Adhered the creases down to form a spine. Please note that these dimensions will give you gussets of varying sizes...the outer one being the widest. I wanted this because I usually embellish the inside covers, even in itty bitties! :D
Here's how I matted the mini album.
 1. Cut 12 pieces of 3.25 inch square designer paper.
2. Matted the pages. Added two top loading pockets on the inside covers to hold booklets.
3. Matted the cover, spine, and back cover--retained the same pattern as the lid for the first two. For the back cover, I used the cut-apart sheet from the collection!
I also added belly bands and diagonal pockets on other pages of the album--you'll see them in the finished album.
I decorated the box and the album using Itsy Bitsy chipboard pieces (Forever Love and Butterflies), Little Birdie Sparkle and Mix Media (canvas) flowers, Little Birdie Handmade flowers, Nyra metal charm, Itsy Bitsy faux pearls, Valentine's Day special burlap hearts embellishment, IB satin ribbons, and glitter glue from my stash.
Here are the glamor shots!
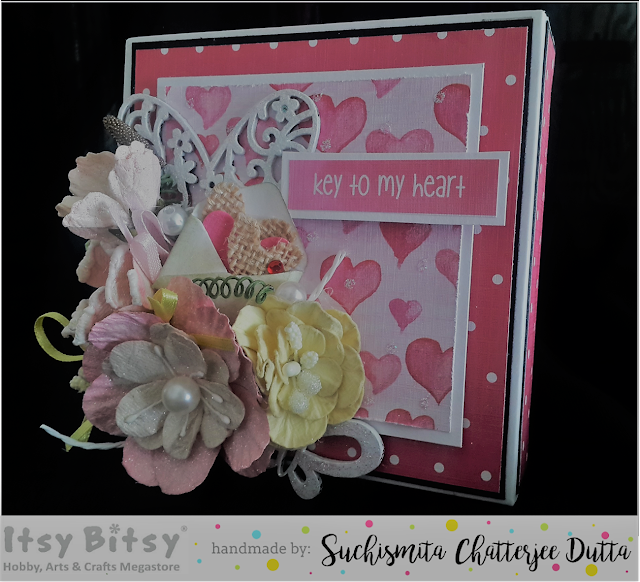


More views of the the box:
 And the mini album that sits in it:
 A peek at the pages...top loading pockets, diagonal pockets, and vertical belly bands.There are two of each feature across 6 pages.

So that was my "Key to my heart" itty bitty mini album in a box. I hope you have enjoyed. Please leave us your comments/questions. It feels great to hear from you and I will make sure to reply!

Happy crafting!
xoxo
Suchi
I am back with more pastel love! An itty bitty mini album inside an altered box. What better way to send sweet nothings to that special someone than a shabby floral box to keep your whispers safe? ;)
Follow along as I go through the process of altering the box and construct the tiny mini album-step by step... with a spine and gusseted pages!

I decided to upcycle a box in which 4x4 photo prints had been delivered.

2. Decide on which surfaces to mat. I realized that matting the outside of the base would make it difficult to shut the box. The upper lid could catch on the matting. I decided to mat only the outside of the lid.
3. Choose pattern papers. I picked these peppy, cute patterns from the Little Birdie Pretty in Pink paper pack. I decided to save the shabby romantic rose patterns for my next project. (I did give in eventually and used a bit of the rose pattern.....you'll see!)
4. Pick solid card stock if you want to double mat your box. I love double matting.....it enhances contrast and makes the patterns pop! I picked black IB card stock to mat the lid. The white card stock will be used in building the album. Let me mention here that this is the new white card stock from the store.....it's sturdy and scores smoothly, making it perfect for page builds. I have, in fact, made a card stock album (no chipboard).
Here are pictures of the matting process.

2. Matted the lid with pattern paper.
3. Matted the inside of the lid and the base with another pattern paper (no double matting on these.)
Here's how the insides looked after matting...LOVE the polka dots!

Next, prep your chipboard because they may take time to dry.

2. Brush them with gesso and go over them again with white acrylic paint for better coverage.
3. Allow them to dry. I do go over then again with glitter glue right at the end...after they are layered under flowers.
I went on to build my mini album next. I like to keep all the decorating for the end (and that is also how I miss shooting that part...sorry!) Anyway...I digress. Here's what I did for the mini album.

2. This is what I had before starting to score.
3. Scored all three pieces at the 3.5 inch mark on both sides and stacked them one inside the other.
4. Adhered the creases down to form a spine. Please note that these dimensions will give you gussets of varying sizes...the outer one being the widest. I wanted this because I usually embellish the inside covers, even in itty bitties! :D
Here's how I matted the mini album.

2. Matted the pages. Added two top loading pockets on the inside covers to hold booklets.
3. Matted the cover, spine, and back cover--retained the same pattern as the lid for the first two. For the back cover, I used the cut-apart sheet from the collection!
I also added belly bands and diagonal pockets on other pages of the album--you'll see them in the finished album.
I decorated the box and the album using Itsy Bitsy chipboard pieces (Forever Love and Butterflies), Little Birdie Sparkle and Mix Media (canvas) flowers, Little Birdie Handmade flowers, Nyra metal charm, Itsy Bitsy faux pearls, Valentine's Day special burlap hearts embellishment, IB satin ribbons, and glitter glue from my stash.
Here are the glamor shots!


So that was my "Key to my heart" itty bitty mini album in a box. I hope you have enjoyed. Please leave us your comments/questions. It feels great to hear from you and I will make sure to reply!

Happy crafting!
xoxo
Suchi


