Tuesday, August 8, 2017

A Nice and Easy Floral themed Burlap Canvas Wall Art

Good Day to Y'all!
I'm Ann and am here today to share with you the DIY steps to create two easy yet impressive burlap canvas wall art. 


Burlap canvas wall art with Liliana Paper crafting Medley
Burlap canvas wall art with Olivia Paper crafting Medley
Project 1: Burlap canvas wall art with Liliana flowers


Here’s the step-by-step process:

1. Begin by aligning the leaves and the small cylindrical holder of  'Paper Crafting Medley - Liliana' on to the center of the burlap canvas. 


2. Once you are contented with the composition of the leaves, glue them to the canvas using silicon liquid glue.


3. Arrange the flowers to compose a bouquet and glue them.


4. Embellish the canvas with pearl beads and beaded butterflies.


5. Your personalized canvas wall art is ready to flaunt!


Project 2: Burlap canvas wall art with Olivia flowers


Here’s the step-by-step process:

1. Begin by aligning and gluing the burlap doily a bit off center to the canvas.


2. Paste a 2"x 2"picture of your choice between the chipboard and the doily.


3. Arrange the leaves towards the right and bottom of the chipboard.


4. Arrange the flowers on top of the leaves to compose a bouquet and glue them.


5. Embellish the canvas with pearl beads and your personalized canvas wall art is ready to flaunt!


Hope you enjoyed these DIY projects.
Happy Crafting!

Materials required:
Paper Crafting Medley - Olivia 24pcs

Paper Crafting Medley - Olivia

Paper Crafting Medley - Liliana 18pcs
Paper Crafting Medley - Liliana
Pearl Beads - Plastic, Cream #6

Corrugated And Printed Kraft - Melody Beaded Butterflies
Melody Beaded Butterflies

Monday, August 7, 2017

ITSY BITSY BLOG CHALLENGE #7-2017

Hello creative people,

Welcome again!
This is Suchismita announcing the seventh challenge of 2017.


ITSY BITSY CHALLENGE  7-2017 
Theme - Anything goes using  Itsy Bitsy Wooden Alterables, Paper Crafting Medley or Fairy Dust .

Here are some guidelines to participate:
  1. Submission can be any project featuring Wooden Alterables or Paper Crafting Medley or Fairy Dust or all the products  from Itsy Bitsy.
  2. Turn off word verification to enable us to leave comments.
  3. Entries can be submitted until 6th September 2017
  4. In order to submit your entry, click on the inlinkz button provided at the end of this post, add your image and link to your blog post containing the submission. 
  5. Each participant can submit a maximum of 3 entries. Please append numbers 1, 2, 3 next to your name while submitting multiple entries.
  6. Please link to your post and not just your blog.
  7. In your blog post, create a link back to this page. 
  8. Only projects posted during the Challenge period are eligible. Back links are not allowed. Please link creations posted after our challenge has gone live.
  9. Entries are welcome from all over the world. However if you are the winner, we can only ship your prize to an Indian address.
  10. If you don't have a blog and want to add your creation on Facebook, please upload it on our FB group Itsy Bitsy Crafter's Cafe with the hashtag - #itsybitsyblogchallenge717 and add the link here.
  11. Two winners will be picked through a lucky draw, who will each receive a voucher of Rs.500, redeemable online at www.itsybitsy.in
  12. Top 3 entries will be selected by the DT.


Here's what I created with my choice of wooden alterables from the store--an altered paint-brush holder/pen stand also featuring Little Birdie Alcohol Splash sprays and Little Birdie Handmade flowers.


Phew! I Love that woodgrain so much I could hardly bear it to be covered in paint! But the temptation of finally using my Alcohol Splash sprays (that I had to pack away with the rest of my supplies back in April) emerged victorious.
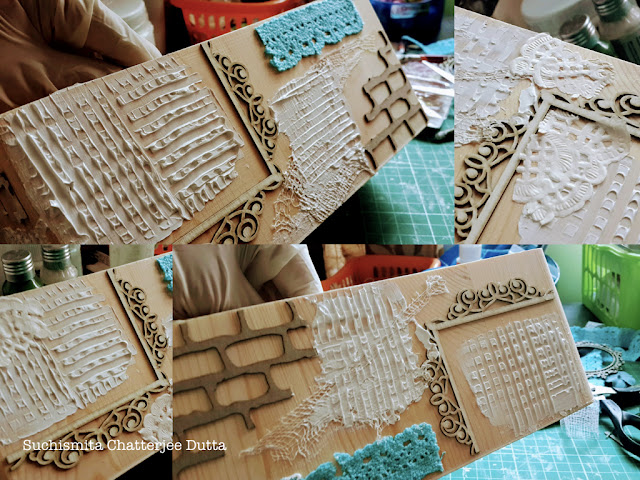
These alterables have a smooth finish but the wood is porous enough for paints to grab--you don't need sandpaper (I was thankful for this especially since I am recovering from a severe reaction to E6000 that nearly claimed my fingers!). I unpacked the pen stand and gathered odd bits of Little Birdie chipboard shapes, lace (that I cut randomly so it looks threadbare), and cheesecloth for layering. This chipboard frame is from the Bryony Papercrafting Medley pack, the rest of which I am saving for another project.


Added further textures using Mont Marte modelling paste and Little Birdie texture triangle #1 from the store.


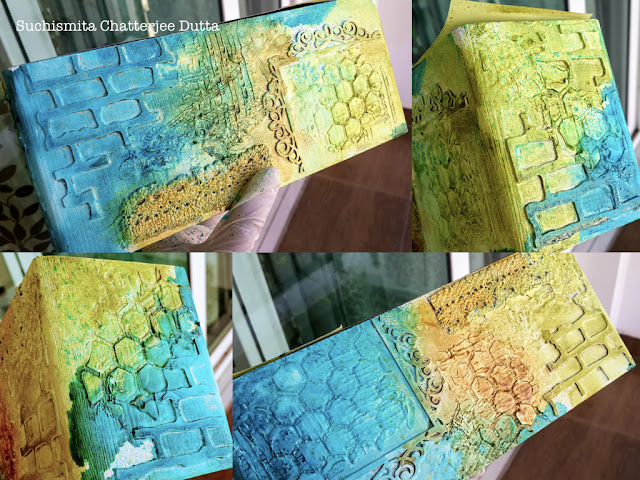
I painted the inside of each compartment with Little Birdie Chalk Paint - Sailing Sky and gesso-ed the textured exterior. 


I did add another layer of texture over this, using the honeycomb stencil from Itsy Bitsy. 

I spritzed Alcohol Splash in Citron Breeze, Frosted Pool, and Golden Mocha--using the blending solution to help the colors merge and avoid harsh lines. 


Next, I gathered embellishments--using another chipboard frame from the store as my focal point. I went over it with gesso and sprayed it with Alcohol Splash in Marigold. Oh and isn't that pack of Renae Blush flowers absolutely stunning? 


Here's my finished project--hope this step-by-step has inspired you to get to your altered project soon! Looking forward to all your entries! 


Happy crafting and all the luck!

xx
Suchi

Supplies used:
Wooden Decorable - Desk Organizer


Renae Blush
Paper Crafting Medley - Bryony 7pcs
CHIPBOARDS SHAPES ORNATE OVAL FRAME 1PC PBCI

CHIPBOARD SHAPES BRICK WALL 1PC IB

Gold Alcohol Splash - Citron Breeze 50ml

Gold Alcohol Splash - Frosted Pool 50ml

Gold Alcohol Splash - Golden Mocha 50ml

Gold Alcohol Splash - Marigold 50ml

Alcohol Blending Solution 50ml
MINI FLOWERS BLUE 18PCS IB
PAPER FLOWERS WHITE 10PCS IB

PAPER FLOWERS WHITE 18PCS IB


Modelling Paste
STENCIL HONEY COMB 18.5 X 24.5CM 1PC

FABRIC GLUE 30ML SQUEEZE

PALETTE KNIFE NO.15 MCG0063 1PC PBCI MM

HOME DECOR CHALK PAINT SAILING SKY 60ML BOTTLE
Home Decor Chalk Paint - Snow