Hello there, dear craft-y friends,
I am back here to wrap up the month of love with a shabby romantic layout featuring Valentine's Day specials from the store! So if you still have these pretty pink papers and flowers left over from Valentine's Day projects----follow along as I make my first layout.
I started with a 12 x 12 inch sheet of white cardstock as my base and went through the pattern papers to pick the patterns I wanted to use for this layout.
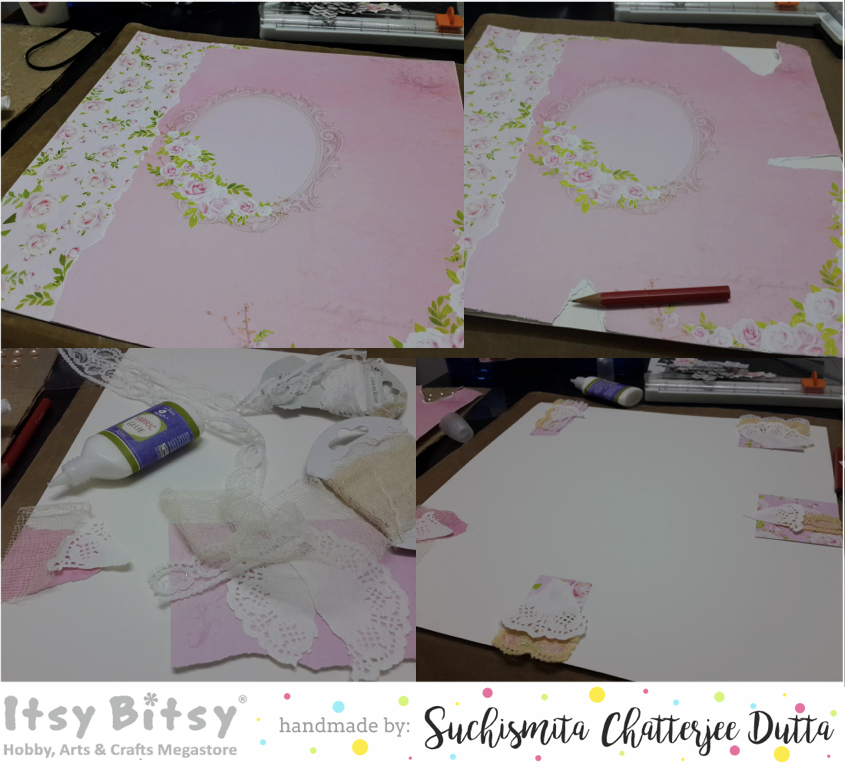
I picked the shabby rose patterns and marked a point about 3 inches in from the left--I ripped the pink sheet vertically at this point, to expose the roses underneath. You will see this in the pictures below.
I tore rough triangles out of the pattern papers to expose the white base underneath. Next, I gathered doilies, laces, and bits of pattern paper to layer under these triangles.
I adhered the pattern papers to the white cardstock base, curled the ripped edges up with my fingers (it is easier if you dab/spray water on the edges before doing this), smeared a rough layer of gesso on the base. This last step helps mute the colors for shabby projects. I added textures with modelling paste and Honeycomb and Script stencils from the store.
Next, I fussy cut a flower spray out of another sheet of pattern paper and selected chipboard pieces for my project. I prepped the chipboard pieces with a layer of gesso and pearl acrylic paint from the store. I dabbed the edges of the flower spray with gesso.
I went on to select pictures for the layout (I ended up removing these pictures at the end, though) and create the photomat. For the photomat, I took a piece of packaging from one of the IB flower packs, trimmed pattern paper down to squares and rectangles, layered them, and stapled them together.
Also, remember to mark the spot for the photomat on your page base before adding textures and/or paints. You will see my photomat in the bottom right image above. I have layered pattern paper, chipboard, doilies, banners, and cheesecloth. All pattern paper pieces have ripped edges.
I placed the photomat, chipboard pieces, flowers, and leaves on the base without pasting them right away. I needed to know if they work well together.
I realized the pictures may not work so well...and the bottom left hand corner of the mat needs more interest. Here's what I finally came up with.
I added a polka photomat and a few lines from a favourite song...for interest. I went over the sentiment and the quote with glitter glue.
Here are more pictures of the final layout:
I hope you liked my project share. Do leave your comments and question below. I'd love to chat with you.
Happy crafting!
Suchi
I have used the following supplies from the store. Do visit the store for the latest craft supplies:


 I picked the shabby rose patterns and marked a point about 3 inches in from the left--I ripped the pink sheet vertically at this point, to expose the roses underneath. You will see this in the pictures below.
 I tore rough triangles out of the pattern papers to expose the white base underneath. Next, I gathered doilies, laces, and bits of pattern paper to layer under these triangles.
 I adhered the pattern papers to the white cardstock base, curled the ripped edges up with my fingers (it is easier if you dab/spray water on the edges before doing this), smeared a rough layer of gesso on the base. This last step helps mute the colors for shabby projects. I added textures with modelling paste and Honeycomb and Script stencils from the store.
 I went on to select pictures for the layout (I ended up removing these pictures at the end, though) and create the photomat. For the photomat, I took a piece of packaging from one of the IB flower packs, trimmed pattern paper down to squares and rectangles, layered them, and stapled them together.
 Also, remember to mark the spot for the photomat on your page base before adding textures and/or paints. You will see my photomat in the bottom right image above. I have layered pattern paper, chipboard, doilies, banners, and cheesecloth. All pattern paper pieces have ripped edges.
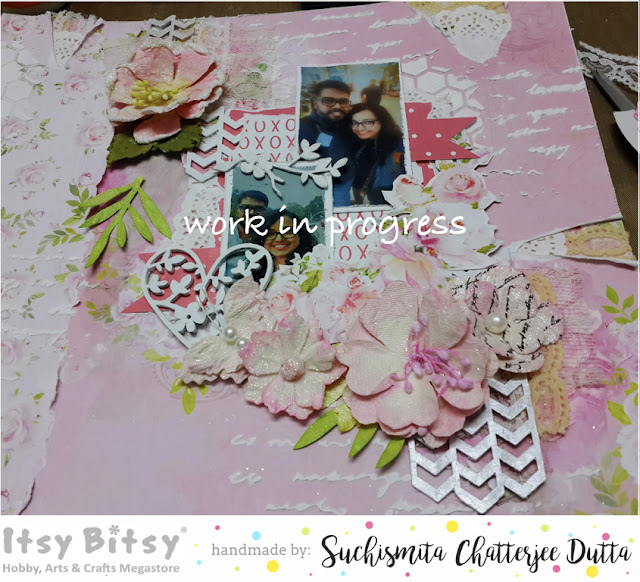 I realized the pictures may not work so well...and the bottom left hand corner of the mat needs more interest. Here's what I finally came up with.


 I hope you liked my project share. Do leave your comments and question below. I'd love to chat with you.