Wednesday, April 30, 2014

DIY Clock for kids - guest post by ArtsyCraftsyMom


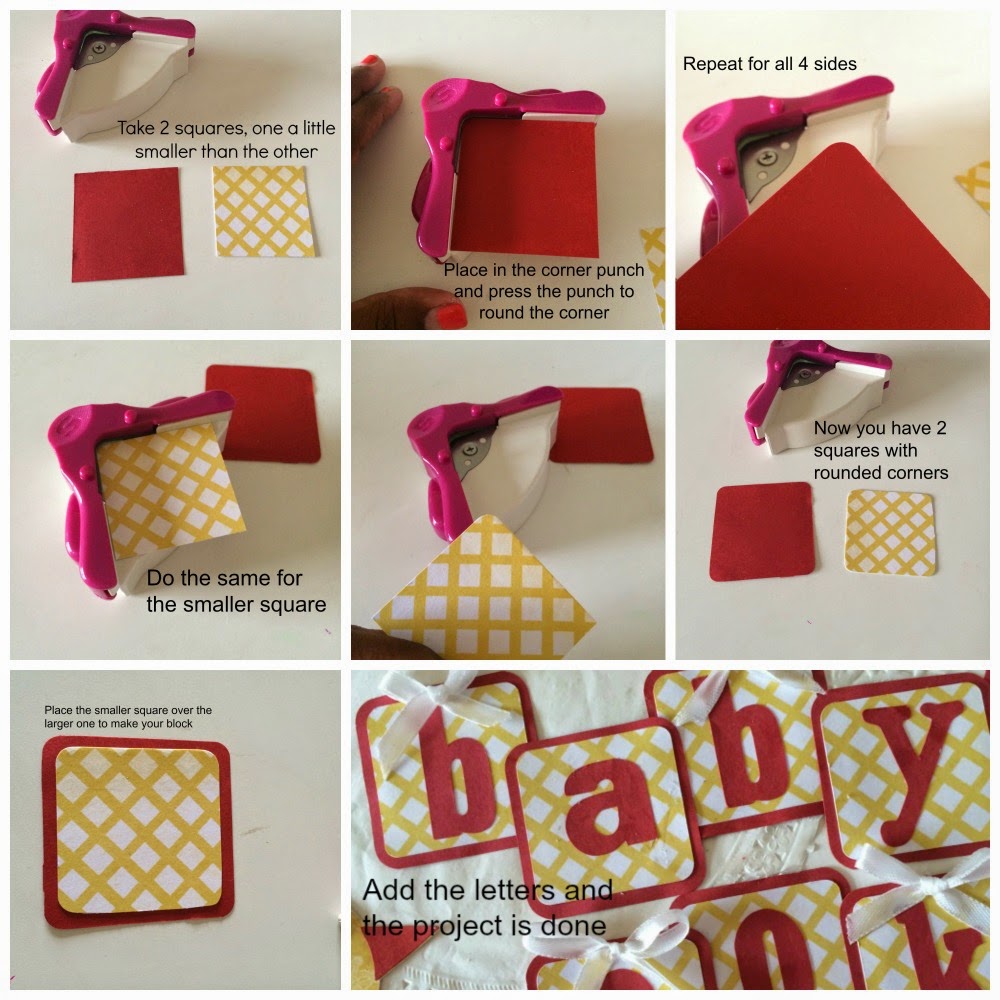
The summer holidays are here and its every mom's worry how to keep the kids occupied and entertained. In fact my biggest worry is also that with no homework for 2 months, Lil P will forget all her school concepts. The last year, I realized that Lil p had got really interested in reading the time. So we decided to make a cute Clock for her to practice her time telling skills.


As usual, I searched my craft stack and we picked up a few things that interested us. Pipe cleaners in red & yellow for the minute & hour hand. She wanted a bird house kind of clock, so we picked up a yellow corrugated sheet and cut into a flower shape. Added a black glitter sheet in the center.


Then the foam sheet was cut into a house shape . 


 Then into a pentagon shape

 Then we added all our embellishments.  Green craft sticks for the roof. Cream ones for the base and handle.  We made a hole in the center of our yellow flower and added the pipe cleaners in the center. Stuck the 1-12 numbers around the clock.  Next we added some stickers & pearl dots . Some pigeons, flowers & clouds and all stuck securely with a glue gun. and our DIY clock for kids was ready. 

Now isn't that a simple project? You can use cardboard instead of foam to make it more stiff. You can also change the look  or theme using different stickers . since the minute & hour hands move easily, Lil P is having fun moving the clock according to the time she wants to set the clock to.

There are more such fun ideas on my blog and pinterest. Do drop by and show us your love by leaving lots of comments.


 Shruti Bhat is a Software Quality Analyst by profession who mostly exercises her left brain during the day at work and her right brain takes over at home. She loves crafting with her 7 year old daughter and blogs at ArtsyCraftsyMom.com. She can be reached at @ArtsyCraftsyMom on Twitter, Facebook & Pinterest

Tuesday, April 29, 2014

A Baby Scrapbook Page for First Impressions

I was recently asked to do a scrapbook for a baby boy. The mother wanted non-traditional colours and plenty of space to record all the details of a baby's first year. One of my favourite pages in any baby scrapbook is the First Impressions Page - where one can store an impression of the little baby's hand and foot. That's what this page is all about.


I decided to use this opportunity to check out the We R Memory Keepers 8 punch. It's a wonderful punch that allows you to make beautiful borders for your scrapbook pages or even cards and albums. I chose the lace kerchief design 8 punch and that beautiful white feature covering the page is all created form this punch. Love love love the effect! Don't you!!


For the baby hand and foot print I thought it would be fun to add little baby feet silhouettes and little baby hand silhouettes as an embellishment. Aren't they adorable! I also liked the little pops of red against the bright yellow and white. A fun and happy colour scheme isn't it!


As cute as this page is, let me tell you, it's no easy feat to get a baby's hand and foot impression. So to make things a little less stressful I created a pocket for the impression card. This way the new mother won't have to force her little infant to press his hand or foot on to the page directly. Instead the impression can be created on the card and then when dry, slipped into the pocket provided. Wish I had the sense to do this for my kids' scrapbooks. Ha ha!

That wraps up this post. Thanks for dropping by folks!

Supplies Used:

Thursday, April 24, 2014

Quirky Money Envelopes


If you're anything like me, you more often than not find yourself giving cash or vouchers as gifts to the people you love. Let's face it, these days we pretty much have everything we really need so finding appropriate gifts is maddening. That said, I hate giving cash or vouchers as gifts - I find it extremely boring and unimaginative, almost thoughtless - that is until I let craft into the equation. Now I can give this extremely boring gift in a truly original manner - introducing quirky money envelopes.  


For women the idea is to make the money envelope or voucher envelope look like a purse. I chose a pretty simple design and added some fabulous pattern paper from ItsyBitsy to pretty it up. For the green purse envelope I used papers from the DCWV Fresh Floral Stack and for the pink one I used the DCWV Basic Stack. Once that was done, a few pearls, buttons and flowers made it a pretty little purse. It's so adorable, my 2 year old daughter insisted on taking it for herself as a toy.


For men, the obvious idea is to make the money envelope look like a wallet. I used an earthy brown as the base colour and jazzed it up again with some pattern paper from the DCWV Tradewinds Stack. The only issue was that it turned out to be quite small because the gift is presented as a folded wallet making it appear quite insignificant. 


That's why I created this box which is slightly larger that the wallet envelope but makes the entire gift seem more elaborate and special. I used the same shade of card stock, pattern paper and ribbon to keep things consistent and voila, my quirky money envelope was ready.

What do you think of these alternative designs to the traditional money envelope? Would love to hear your thoughts - do leave a comment and let me know!! 

Supplies Used:

Thursday, April 17, 2014

The ItsyBitsy Monochromatic Challenge


Folks!! It's time for another challenge here at ItsyBitsy and this time we're challenging you to go monochromatic. What does monochromatic mean? Essentially you have to stick to one colour in your project along with white or black. You can use different shades of the colour that you choose but it has to be just one colour. To inspire you on this journey, I created a set of mini easel cards for you which can be used as gift tags or small greeting cards and each of them are individually monochromatic.


My first Mini Easel Card is inspired by the fabulous designs on the Spellbindes Venetian Accents Die. I had the very good fortune of visiting Venice last August and every where you go, you will find little shops selling the most stunning masks! This die very much captures the whimsical sinister feel of a Venetian mask and I took great pleasure in making it the central feature of this card. The gorgeous paper from the DCWV Luxury Stack along with the ItsyBitsy Damask embossing folder added to the theme of this creation.


For this card I used varying shades of blue to bring about the monochromatic theme. There are blue pearls, blue paper, blue ribbon, and blue flowers all of which are different shades of blue. For the background, I used a Sizzix Embossing folder and I think that added a little more texture to this floral mini easel tag. 


For my third mini easel tag, I used this adorable die from Spellbinders called the Poppy Patch Die. It's just a gorgeous silhouette of little poppies which looks quite spectacular when set against a contrast background. The frame surrounding it is from the Spellbinders Captivating Squares Die. 


Rules of the challenge:
  1. Your entry can be anything hand made as long as it is monochromatic - a single colour with black or white.
  2. Entries can be submitted until 10th May 2014.
  3. Entries will be open to audience vote from 11th to 14th May 2014
  4. Following this, the top 3 and finalists will be selected after combining both audience feedback and judges feedback.
  5. In order to submit your entry, click on the inlinkz button provided at the end of this post, add your image and link to your blog post containing the submission. There is a single category for all types of hand made creations.
  6. If you do not have a blog, please create an album on any online photo gallery like Facebook, Picasa etc, ensure the settings are public and link it up as detailed in point 5. 
  7. Each participant can submit a maximum of 3 entries.
  8. Submitting old projects is not permitted. All submissions have to be created after 17th April 2014
  9. In your blog post, create a link back to this page - The ItsyBitsy Monochromatic Challenge.
  10. Entries are welcome from all over the world however if you are one of the top 3, we can only ship your prize to an Indian address.
  11. We will select the top 3 entries all of whom will receive vouchers worth Rs. 500 redeemable online at www.itsybitsy.in.
  12. In addition 6 finalists  will be selected all of whom will receive a badge to display on their blog.
Well that just about wraps up this post! Looking forward to seeing your creations!! All the best folks!

Submissions for the Monochromatic Challenge

Supplies Used

Tuesday, April 15, 2014

Baskets for Easter!!


It's almost Easter and whether or not you celebrate it, it's always fun to nibble on an easter egg! Preferably a chocolate one filled with little marzipan treats. I wanted to get in on the easter fun so I decided to make a few baskets that could be used to present easter eggs. And here is my set of Easter Baskets!


Easter colours are the colours of spring - yellows, pinks, greens and more bright shades. So naturally my baskets followed this theme. I found this SUPER easy tutorial online to make the baskets and you have to try it - it's so so so so easy! 


The papers I used for the baskets are all from the DCWV Fresh Floral Stack which is just perfect for Easter!! Full of lovely floral pastels, I went nuts choosing from the designs. Once the basket shell was ready, I added this pretty frill with solid card stock using the Spell binders Asian Accents Die. This die set comes with a border die and some other embellishments. I thought the border worked wonderfully for my project.


Finally to fill the empty space inside the basket I relied on the brand new shredded tissue newly launched at ItsyBitsy. How perfect was it to fill up the space and also provide a nice nesting space for the little chocolate eggs!

Supplies Used

Friday, April 11, 2014

Crafting with the Kids using an ItsyBitsy DIY Craft Kit!


It's the summer and if you're a parent, you're probably breaking your head trying to keep the kids busy. There are summer camps, vacations, sports activities and of course craft! Being an avid crafter myself, my kids too want to join in on the fun and rather than break my head trying to figure out what to make with them, I decided to let ItsyBitsy do all the thinking for me! We picked up a clown kit which thankfully had 2 clowns to make inside, Dhruv took one, Kyra took the other and 1 hour of the afternoon was spent crafting!


The kit came with everything we needed to make a little clown. The background paper, the clothes, the hair, the eyes, the pom pom nose and the embellishments. It comes with an instruction leaflet as well but it really wasn't necessary, everything was pretty much self explanatory. The kids had a blast sticking, gluing and bringing their respective clown to life. My role was purely supportive.


At the end of the crafty afternoon, two clowns were ready and my kids were just delighted. I added a craft stick at the back so that they would stay upright almost like a puppet. My son who is now five, had fun playing little pretend games with his clown while my 2.5 year old daughter decided to test the strength of her clown by ripping it to bits!! She quite a little destructor!


Here's a look at the completed clowns (before Kyra began her game). I was pretty impressed with how similar it looked to the pack cover. These DIY kits are really the best way to craft with your kids. You get everything you need to make a nice, neat and easy craft project!

To have a look at the massive range of Do It Yourself Craft Kits, click here. You're sure to find one that works for you!

Saturday, April 5, 2014

A Set of Vintage Frames


I have been in this home improvement drive for a couple of months now. I am revamping my balcony and my family room. One of the things I needed to do was fill up the empty walls and try as I might, I couldn't find wall art that really matched my style or colours. Being a crafter, I figured - if I can't find it, I might as well make it and here's my first attempt at wall art - a set of Vintage Frames. 


The Tim Holtz Alliterations Series of Sizzix Bigz Dies proved to be my inspiration. There are a whole bunch of vintage designs and my favourites were a vintage camera, a vintage car (jalopy) and a vintage telephone. I decided to use these designs as the focus feature of my vintage frames. 


I cut out each design on brown card stock and used a sheet from the DCWV Heirloom Stack for the inner accents. I used this same pattern paper for the backdrop of each frame which I glued on a piece of  square chipboard so that the frame was sturdy. Each die cut was glued on with two layers of double sided tape so that it really popped out in a nice dimensional manner. 


I then proceeded to make the shadow box frame using brown card stock. I followed the template on this link which details quite easily how to create your own box frame. All you need is some card, a scoring tool and a scissors and your frame will look as crisp and clean as a wooden one.


Once my set of frames were ready I fixed them on the wall of my family room, just next to the book case. The jute blinds were the same shade of brown so that complimented it very nicely and honestly when you look at it, you won't even think it's paper.

How do you like my Vintage Wall Art? Have you tried anything like this? Would love to have a look - leave your link and I'll be sure to pop by.

 Supplies Used:


Wednesday, April 2, 2014

A Bright and Happy Baby Layout


I love doing baby scrapbook layouts and with the wonderful dies and papers at ItsyBitsy, it's really a pleasure to put such pages together. I wanted to do a layout for a boy that was not confined to the traditional blue colour scheme. My attempt was to make a cute fun baby boy layout using non-traditional colours. After much trial and error, the colour scheme I selected was red, yellow and white and here is the layout I created. 


ItsyBitsy has this great sailor outfit die that is really quite adorable. You get a t-shirt, a romper and a little sailor hat within the die. I decided to put it to use to create a little clothes line at the top of the page, because nothing says baby like baby clothes hanging to dry. The yellow paper I used is from the DCWV Lemon Flower Stack and and the red paper is from the ItsyBitsy punch paper range. And I hope you didn't miss the cute little heart buttons on the romper!! So adorable right, perfect to complement the heart die cut that came with the sailor suit!


For the baby book text I wanted to create this kind of alphabet block look which was super easy to do. Here's a picture tutorial of how I did it. The letters are cut from the Sizzix Word Play Die and I rounded the corners with the ItsyBitsy corner punch. 

Finally to embellish the side I used the Sizzix Bigz Bird Die which again I think is super cute! All the different elements come in separate dies so that you can cut each in any paper of your choice. It also includes dies for the eyes and eye balls but I decided to go with the buttons which I think look super cute! 


Here's a picture tutorial of how I put one of the birds together. Really straightforward but it gives you an idea of how the die cuts emerge.


How do you like my colours and the little baby elements? Would love to hear from you. Do leave a comment and let me know!

Supplies Used: