Saturday, November 30, 2013

Introducing Little Darlings Stamps at ItsyBitsy

We at ItsyBitsy are SUPER thrilled to introduce our fabulous new range of Little Darlings rubber stamps at our stores and online! Now you can make beautiful cards, scrapbooks, notebooks, frames and whatever you like with adorable images to stamp and colour. And the best part is that they're so affordable! Starting from as little as Rs. 499, you can have a variety of designs to choose from to make exactly the kind of project you have in mind. Here's just a glance at the options available!


And if you need some project ideas on how to use these stamps, here are some pictures of cards created using different Little Darlings stamps! Aren't they just darling!!


I too got bitten by the Little Darlings bug and picked up one for my notebook project last week. Here's what I created with the Little Darlings Go Girl Go stamp as the focal point!


Have you tried any of these stamps yet? Would love to see your work. Leave a comment and let us know and we'll be sure to drop by!

Tuesday, November 26, 2013

Jewellery Inspiration for the ItsyBitsy Picture Inspiration Challenge

Folks, we hope you're hard at work with your creation for the ItsyBitsy Picture Inspiration Challenge. Our design team at ItsyBitsy loved the picture to bits and put their creative juices to work to make a fantastic Jewellery project! Here's their fabulous creation!
Wow! Isn't it a stunner! What a fantastic use of beads and ItsyBitsy findings. I just love it to bits and I guess what I like the most is that they have picked out different shades from the inspiration picture than is most evident! Love that! Here's the inspiration picture for you again.


Hope this gets your creative juices flowing folks and really looking forward to seeing your creation! Click here to for details on the challenge and how to enter. 

Sunday, November 24, 2013

Girly Girly Notebooks


Today I have a seriously girly project to share with you. The concept took shape when I first saw the new fantastic range of stamps here at ItsyBitsy. The collection is called Little Darling and ItsyBitsy is stocking such adorable designs that I knew I wanted to do a really girly project. I picked up a fun stamp of a girl enjoying a hula hoop and then based my project on that. 


I started with colouring the stamp. I decided to go for a pink and blue scheme and consequently that became the theme for my notebook. I chose papers from the DCWV French Country Stack to support my palette. I got this smart fence embellishment from the ItsyBitsy store which I laid on the lower portion of the notebook cover. Then on top I added my coloured stamp cut out on the Victorian Rectangle Die. I added a whole bunch of pink and blue flowers to make it as pretty and girly as could be. Then right at the end I placed a pretty pink bow and topped it with this super sweet photo frame locket charm from ItsyBitsy. It's really cool! You can actually add any picture you like into that charm!


Of course as with most of my gift projects, I end up making a box for it. I don't know how to end this compulsion but at the moment it's become almost uncontrollable. The same fence embellishment was added to the box cover and an ItsyBitsy Gardenia bloom at the top. 


I decided to make another girly notebook with the same stamp albeit with a different colour scheme. This time I went for pink and beige so my book has a slight vintage edge in its design. The base paper is all from the DCWV Fabric Paper range so when you touch it, you can actually feel the texture of fabric. The stamp was coloured using the same shades and to embellish it, I used a die cut from the Intricutz Flourish die and a chipboard lasercut as a frame. A bunch of flowers and an organza ribbon bow finished off the book which was now ready for its box. 

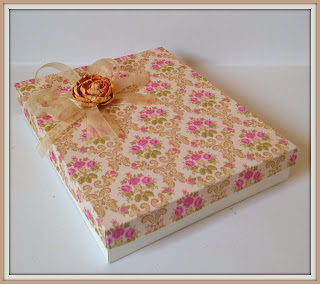
The box again has the same fabric paper for the lid and I restricted my urge to embellish it heavily. Just an organza bow and an ItsyBitsy Bloom did the trick.


Both my notebooks are punched using the Cinch Binding Tool and bound using the We R Memory Keepers Binding Wire series. The Cinch is so convenient for such projects where you have to punch so many coordinating holes and the binding wire is awesome as it comes in different sizes and colours. 

I personally LOVED my girly notebook project. Love the books, the coordinated boxes and of course that fantastic stamp! What do you think? Leave a comment and let me know!

Supplies Used

Thursday, November 21, 2013

Winners of the Anything Goes with ItsyBitsy Challenge

Folks! We are here with the winners and finalists for the Anything Goes with ItsyBitsy Challenge. This time we continued with the new methodology. We invited all your fabulous entries and then opened the gallery to audience votes. The judges made their choices after considering the audience feedback as but  bear in mind that audience feedback was not the sole deciding factor, it was used to help choose a winner.


So without further delay your winners are Sathya for this exquisite White on White Card for Paper Crafting and Smita for this fantastic Terracotta jewellery set. Satha used the ItsyBitsy Spots Embossing folder and the ItsyBitsy Thin Cuts Venetian Panel Die in her beautiful creation. For Smita's creation, the paints and findings are from ItsyBitsy. Well done Sathya and Smita. You both get a voucher of Rs.1000 from ItsyBitsy so write in to info@itsybitsy.in to claim your award and winners badge.

Now on to the finalists. For Paper Crafting the creations that really stood out for us in no particular order were:


Rupa for this gorgeous altered liquor box. Rupa used the scallop square die, TH tattered leaves die and Pattern Paper all from ItsyBitsy. 


Tanvi for this admirable book box! Click on her link to see the project, it's really fabulous. Tanvi used red embossing powder and pattern paper from ItsyBitsy in her creation.  

 Viola for these adorable quilled Santa's. Viola used different sized quilling strips and pearl stickers from ItsyBitsy in her project. 


Durga for this beautifully constructed card.  Durga used ItsyBitsy Embossing folders in her project. 


Sridevi for this clean and captivating accordion card project. Sridevi used crepe paper from ItsyBitsy in her project. 


Shilpa for this adorable and innovative card! The toads and the grass embellishments are from ItsyBitsy. 

Now on to the finalists for Jewellery Making. Since there were just 15 entries, we've shortlisted 3 finalists whose work really stood out in no particular order. 


Pratyusha for this extremely original set. Pratyusha used quilling strips and jewellery findings from ItsyBitsy in her project.


Radhika for this innovating and attractive creation. Radhika used a number of products from ItsyBitsy in her project but the most interesting is the pendant which she created using one of our cling stamps. Fantastic stuff Radhika!


Viola for this striking terracotta set. Viola used terracotta beads and paints from ItsyBitsy in her creation. 

Well done to all the crafters mentioned in this post! Congratulations on your fine work! We're thrilled to see such wonderful creations arising from ItsyBitsy products! Please write in to info@itsybitsy.in to obtain your badges. 

Looking forward to seeing your entires in our current Picture Inspiration Challenge. See you soon!


Monday, November 18, 2013

Ideas for Clean and Simple Cards (CAS)

If you're new to crafting, you may be confused when you read abbreviations like CAS. CAS stands for Clean and Simple cards. Usually such cards have one layer or maybe 2, large amounts of white space or open space on the card and have a single focal point. It sounds simple enough but unless such projects are instinctively your style aesthetic, you'll actually find it more challenging than an elaborate and intricate card. In this post I will share 3 projects to give you some ideas on how to go about your CAS cards.


My first card shows how you can use an embellishment to create a clever CAS card. I have this little dress on a hangar embellishment from ItsyBitsy. I decided to hang it on a ribbon and add the sentiment 'Hang in There'. To create this card I embossed some white card stock with the ItsyBitsy spots folder. I added a spotted pattern paper above it from the DCWV Lemon Flower Stack and created a scalloped band in the centre with my rotary cutter. Then I tied  a bow and hung my embellishment. The text is cut from my Sizzix Doodle with Dazzle Die. 


My second card shows how you can use small decorations to create a clever card. I used my Sew Easy stitching tool to add 3 cross stitches on the corner. Then I added a sentiment below titled - 'Sew' Grateful. It seems so easy and clever right but I spent so so so so so much time getting the colours, the papers and the layout right. I used the DCWV Luxury stack for this pretty green design. 


My third card shows how you can create a very smart modern card using shapes and buttons. This one is a Christmas tree. I just cut out a triangle from a paper in the DCWV Evergreen Stack. Then I sliced off bits in the middle. I filled these gaps with red buttons from the ItsyBitsy Fashion button collection and voila my CAS card was ready.

Have you made a CAS card that you're really happy with? Leave a link and let me know, would love to drop by!

Supplies Used:

Friday, November 15, 2013

The Itsy Bitsy Picture Inspiration Challenge

Folks, it's the 15th of the month and time for a brand new challenge here at ItsyBitsy. This time, we have a beautiful picture inspiration for you and we want you to create anything you like as long as you are inspired by this picture. It could be the colours of the picture, the objects in the picture, the layout of the picture or all of the above. Just make sure it's clear what your inspiration was. As always there will be two categories - Jewellery Making and Paper Crafting.


And to get you started, here is some inspiration! I created an easel card with a drawer which I think is a really clever way to present a gift to someone. I've based my design on the colours in the picture and added a lot of flowers too, which is taken from the picture too.


I used the Spellbinders Fleur De Lis border die to create the fantastic edge to the top layer. I also used some paper from the DCWV Lemon Flower stack for that pretty green design.


How do you like my large roomy drawer? Isn't it nice to slip in some jewellery or a gift voucher? I think so. This isn't the first time I've tried an easel card with drawers. You can see my previous project here and to see a video of how to do it, click here.


Rules of the challenge:
  1. For the Paper/ General crafting project, your submission can be a card, box, tag, scrapbook layout, dress, embroidery, crochet work etc - anything as long as it is handmade and
  2. is inspired by the picture at the top of this post. 
  3. For the jewellery making project, your submission must be some form of jewellery and once again must be inspired by the picture at the top of this post. 
  4. Quilled jewellery or jewellery made out of paper beads will fall under the Jewellery making category.
  5. Entries can be submitted until 10th December 2013.
  6. Entries will be open to audience vote from 11th to 14th December 2013
  7. Following this, the winners will be selected after combining both audience feedback and judges feedback.
  8. In order to submit your entry, click on the inlinkz button provided at the end of this post, add your image and link to your blog post containing the submission. There is a separate button for each category.
  9. If you do not have a blog, please create an album on any online photo gallery, ensure the settings are public and link it up as detailed in point 5. 
  10. Each participant can submit a maximum of 3 entries within each category.
  11. Submitting old projects is not permitted. All submissions have to be created after 15th November 2013
  12. In your blog post, create a link back to this page - The Anything Goes with ItsyBitsy Challenge.
  13. Entries are welcome from all over the world however if you are the winner, we can only ship your prize to an Indian address.
  14. 2 winners will be selected, one for jewellery making and one for paper/general crafting who will each receive a voucher of Rs. 1000 each, redeemable online at 
  15. In addition 3 to 6 finalists in each category will be selected all of whom will receive a badge to display on their blog.
Stay tuned to the Jewellery Making Inspiration which will be published in a fresh post on the 25th of this month.

All the best folks!!!

Submissions for Paper Crafting


Submissions for Jewellery Making


Supplies Used

Thursday, November 14, 2013

A Floral Frame Gift Set


My four year old son had to participate in a shloka recitation contest in school last week. Being a Christian, I had no idea where to even begin teaching him a shloka. The grand-mother of one of his school friends very sweetly agreed to help and thanks to her daily attention for 2 weeks, he recited his shloka flawlessly and effortlessly! I was bursting with pride and filled with gratitude too, towards this wonderful kind lady and her patient teaching, encouragement and support. Of course I wanted to make something to thank her and this is what I presented. 


 My set has 3 components - a photo frame, a card and a box. I wanted to use my Tattered Floral Die from ItsyBitsy to make some lush red open roses and I  built my project around that. I will shortly be uploading a video tutorial on how I made this photo frame including the flowers so watch this space for all the details. 


Next I made a card in which I could write my words of thanks to this lovely lady. I followed the same theme as the frame. Plain and simple with a little pop of red. The pattern paper is from the DCWV Forever and Always Stack. Love the muted greys against the bold red. 


My final project was a box in which I could place the frame and the card. I added a big bow using some mesh ribbon and one more rose in the centre. Here's a closeup of the bow. 


When my son and I presented her with this gift, she was very reluctant to take it. 'No gift necessary!' she insisted!! But then I told her that it was hand-made - that I had made it for her and she relented. She was delighted and grateful.

How do you like my floral frame set? Would love to hear your thoughts.

Till then Happy Crafting

Supplies Used