Tuesday, December 31, 2013

A Recipe Book File for my Mom

My mother and I were talking once and she mentioned how her ancient recipe book containing all the recipes she had accumulated since her marriage was falling apart. She casually commented that she would like some sort of file to stock her recipes, where she could put all the old recipes that she had scribbled down over the years and the new ones that she had printed off the Internet. So when Christmas rolled around, I figured the best gift to give her would be an upcycled file to serve as her new Recipe Book. 


My mother's kitchen is a pristine black and white and she has gone to great lengths to comply with the colour scheme. The counter is black granite, the cupboards are white with black knobs, the curtains are black and white polka dots and even the tea and sugar containers are black and white. It was obvious what the colours of my upcycled file had to be - Black and White. 


The original file was blue and I wanted this to be completely erased. I covered the file from top to bottom with some papers from the DCWV Basic Stack. They had a number of black and white options and I chose the one I thought would work best. The paper size was 12" by 12" so I had to use additional strips of the same design to cover the space but the good thing is that since it was such a pattern heavy paper, the joins were barely visible. 


My mother also prefers clean and simple projects as opposed to heavily embellished ones. So I had to keep this file as minimal as possible. After covering the file with the paper, I added some coordinating  designer tape from ItsyBitsy to conceal the blue edges as well. 


Next I added some round doilies from ItsyBitsy, my mom LOVES doilies and thanks to ItsyBitsy, you can get a variety of doilies in a variety of sizes so getting the appropriate one is easy-peasy. I found the most perfect alphabet letters at ItsyBitsy - they were the right colour, the right size and the right finish so I added them as the title. Then I covered the entire file with a layer of Mod Podge. Once it dried, everything was glued down in place, firmly sealed in and I could rest easy that the Recipe Book File would last for the rest of my mothers cooking days.  


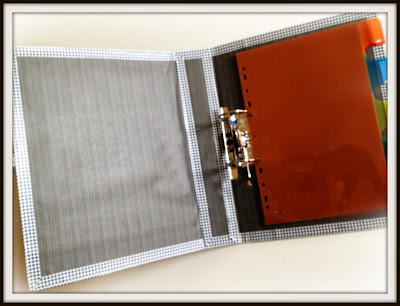
Here's a look at the file when it's open. I used a different pattern paper on the inside but sealed it in with the same designer tape. I picked up some file separators at my local stationary store so that my mother could categorise similar recipes together. I literally finished this project at 2am on Christmas morning!! And presented it to my mother on Christmas Day, lunch time.

She was very very touched and delighted with her present. And I am delighted to share this one with you. Thanks so much for stopping by and from all of us here at ItsyBitsy, have a great 2014!!!

Supplies Used:

Saturday, December 28, 2013

Festive Goody Boxes for Friends and Family


The Festive Season is still going strong and we're loving your entries for our Festive Challenge! I wanted to share something I made for my family and loved ones this year. I needed to make some really festive goody boxes and I didn't have much time to put them together. I ultimately chose this design which was perfect! It was cut out of one piece of card and didn't need an additional lid to be made.


Here's a closeup of box. I made it out of plain white card which I embossed with the ItsyBitsy Spots Embossing folder. Love how it mimics snow fall. I added 2 holly leaves using the ItsyBitsy holly leaf punch and for the red berry, I added a little red button from my Fashion Button pouch. Voila! My festive goody box was done!


Here's a look inside the box. I packed it with 9 mini cupcakes using cupcake liners and moulds that I picked up from ItsyBitsy. These liners are just perfect because the resulting cupcake is just the size of a large mouthful - perfect for a quick bite during the holidays when we're all just stuffing our faces all the time!

Well that wraps up my post! Hope you're having a great festive season and crafting away to glory! Thanks for dropping by!

Supplies Used

Wednesday, December 25, 2013

ItsyBitsy wishes all our Wonderful Crafty Friends a very Merry Christmas !!!

It's Christmas Day and we at ItsyBitsy want to wish all our wonderful reader, followers, fans and shoppers a very Merry Christmas. To celebrate the day, I'm sharing 5 of my favourite Christmas cards of all the cards I made this year. For each one I used a fabulous ItsyBitsy Christmas embellishment, a wonderful ItsyBitsy Embossing folder, some fantastic dies and loads of ribbon. 


For my first card I used some buttons as ornaments along with thin satin ribbon to create a Christmas scene of sorts. The background is embossed with the ItsyBitsy stars embossing folder and a pretty doily added to the texture of the project. My second card was focussed on the poinsettia embellishment available at ItsyBitsy. I used some circle framelits dies to create a window and embossed the top layer with the ItsyBitsy Flowers embossing folder. 


For my next 2 cards I once again created windows using a square Framelits die and rectangle Framelit die. After embossing the top layers with the damask design and spot design respectively, I simply added the ItsyBitsy Christmas embellishment inside the window and my cards were done!


For my final card, I went white on white. A doily combined with a glitter foam snowflake embellishment from ItsyBitsy formed the central focus of my card. The background is embossed with a stars design and a ribbon knot in the centre finished off my card.

Have you made any Christmas cards this year? Would love to see, leave a comment with the link to your blog, and I'll be sure to drop by.

Merry Christmas folks!!

Supplies Used

Monday, December 23, 2013

A Decoupage Frame Set

For most new mothers, a good paediatrician is a godsend! There are so many doubts and worries you have when you're embarking on the tumultuous journey into motherhood and having a calm, experienced and practical person guiding you along is such a blessing. I was really lucky to find such a wonderful individual as my son's paediatrician six weeks into his life. She has continued to be my calming influence through my second child and every day I thank God to have someone like her in my life for my 4 year old and 2 year old. 


Recently my son was going through some unusual behaviour and it became so worrying that I was really at a loss. I went to Dr. Praveen Bopaiah, my wonderful paediatrician to ask her for advice and as always, she gave me the most practical and sensible suggestions. Without going into details, her advice worked perfectly and my son was back to normal in just a couple of weeks. I was so so so so grateful to her, and this time I decided to make something for her to really convey my gratitude. Thanks to Facebook, I found a lovely photo of her family. I headed over to ItsyBitsy, found some great Mod Podge supplies and got to work on my project. 


ItsyBitsy has a great range for Decoupage, from MDF Blanks, to Mod Podge blanks to Decoupage papers. After selecting what I needed, I got to work on my project. I was using a MDF Photo Frame, the Crackle Finish Mod Podge pack, some papers from the DCWV French Country stack and some pretty ItsyBitsy blooms.


I covered the MDF Frame with my pattern paper and coated it with one layer of the Crackle Finish Mod Podge. Then I added some flourishes using one of my favourite Couture Creation Intricutz Flourish dies from ItsyBitsy. I placed them randomly all over the frame and added another layer of Mod Podge. I had now created a unique background for my frame.


The next step was to add pearls all over the edges, love how they glamourise any project, particularly photo frames. I used some large size pearl stickers which are available at ItsyBitsy. Finally I added my ItsyBitsy Blooms on 2 corners of the frame. Voila it was done!


Of course I had to make a card to say thanks and I continued with the same pattern paper, flourishes and complementary flowers. The sentiment was cut on my Doodle with Dazzle Die and once everything was glued in place I added a layer of Crackle Mod Podge once again. 


Needless to say my doctor was touched and grateful with my gift. Seeing her family framed in that way really made her feel special and I was happy for that. Of course through it all, I was just thinking that this frame was such a small token of thanks compared to the magnum of gratitude I actually felt for her. Nothing can really convey it but I guess this is as close as it gets!

Have you made a decoupage frame? Would love to see! Leave a comment and I'll be sure to pop by. Till then, Happy Crafting folks!

Supplies Used


Saturday, December 21, 2013

Winners of the ItsyBitsy Picture Inspiration Challenge


Folks! We are here with the winners and finalists for the ItsyBitsy Picture Inspiration Challenge. This time we continued with the new methodology. We invited all your fabulous entries and then opened the gallery to audience votes. The judges made their choices after considering the audience feedback but  bear in mind that audience feedback was not the sole deciding factor, it was used to help choose a winner.


So without further delay the winners are Dr. Sonia for her fantastic Christmas Diorama in the Paper Crafting Category and Viola for this fun and festive quilled jewellery set in the Jewellery Making Category.  Well done winners!! You both get a voucher of Rs.1000 from ItsyBitsy so write in to info@itsybitsy.in to claim your award and winners badge.

Now on to the finalists. For Paper Crafting the creations that really stood out for us in no particular order were:

Viola for her fun and adorable quilled wedding scene. You can see more details of her project here.


Nupur's lavish and grand explosion box. You can see more details of her project here.


Sathya's delicate and ornate floral easel card. You an see more details of her project here


Kaija for her pretty and flirty card. You can see more details of her project here.


Anuja's adorable Christmas Ornaments! You can see more details of her project here


Shilpa for her stunning mixed media project. You can see more details of her project here.


Moving on to the finalists for Jewellery Making.  Here they are in no particular order:

Divya for this gorgeous foam rose bracelet. You can see more details of her project here.


Dr. Sonia for this awesome foam jewellery set. You can see more details of her project here.


Somadeepa for this adorable quilled cake pendant. You can see more details of her project here.


Congrats to all our winners and finalists. Please write in to info@itsybitsy.in to claim your badges. Hope you are all working on your submissions for the 'Make it Festive' Challenge. Can't wait to see your creations.

Till then, Happy Crafting folks!

Sunday, December 15, 2013

The ItsyBitsy Make it Festive Challenge

Folks it's that time of year again when festivities are all around us. Whether it's Christmas or the New Year or Big Fat Indian Weddings, we're in the mood for celebrating. So the theme for our challenge this month is to Make it Festive! You can make anything you like as long as it complies with the festive theme. As always we have 2 categories - Jewellery Making and Paper/ General Craft. So put on those thinking caps and send in your entries. Scroll down for the rules and details on how to enter.


To inspire the Paper Crafters/ General Crafters, I have made some Re-usable Christmas Dish Labels for you. I usually have a Christmas Party every year in my home and I thought it would be pretty fancy to add a little label for each of the dishes I served.


Each label is designed to look like an Easel Card and shaped using the Spellbinders Cherry Pickin Frame  Die. This die is fantastic - I love the shape and design but I mostly love the stencil feature. All those cherries are part of the stencil. So after I cut my card, I leave it within the die and flip it over to start stencilling. I added some versamark ink to the exposed surfaces. Then I removed the die and added some Red WOW Embossing Powder. Once the excess was dusted off, only the cherries were coloured. Confused? No worries - I have done a tutorial on using the stencil feature of this die with another project. You can view it here.


The most exciting part about this project is that the label is re-usable. The top layer is an OHP sheet or transparency sheet so that if you write on it with a white board marker, it can be erased with a whiteboard duster or napkin. I've done dining labels before, which you can view here but they were one-time use creations. My Christmas party was last night and here are the labels proudly displayed on my table. 


Rules of the challenge:
  1. For the Paper/ General crafting project, your submission can be a card, box, tag, scrapbook layout, dress, embroidery, crochet work etc - anything as long as it is handmade and
  2. complies with the theme.
  3. For the jewellery making project, your submission must be some form of jewellery and once again must comply with the theme.
  4. Quilled jewellery or jewellery made out of paper beads will fall under the Jewellery making category.
  5. Entries can be submitted until 10th January 2013.
  6. Entries will be open to audience vote from 11th to 14th January 2013
  7. Following this, the winners will be selected after combining both audience feedback and judges feedback.
  8. In order to submit your entry, click on the inlinkz button provided at the end of this post, add your image and link to your blog post containing the submission. There is a separate button for each category.
  9. If you do not have a blog, please create an album on any online photo gallery, ensure the settings are public and link it up as detailed in point 5. 
  10. Each participant can submit a maximum of 3 entries within each category.
  11. Submitting old projects is not permitted. All submissions have to be created after 15th December 2013
  12. In your blog post, create a link back to this page - The ItsyBitsy Festive Challenge.
  13. Entries are welcome from all over the world however if you are the winner, we can only ship your prize to an Indian address.
  14. 2 winners will be selected, one for jewellery making and one for paper/general crafting who will each receive a voucher of Rs. 1000 each, redeemable online at 
  15. In addition 3 to 6 finalists in each category will be selected all of whom will receive a badge to display on their blog.
Right that's it from me! I'm eager to see your creations so start loading them into the gallery! I'm sure it will be a feast for the eyes!!!

Submissions for Paper Crafting

Submissions for Jewellery Making

Supplies Used

Friday, December 13, 2013

A Look our Newest Store in Phoenix Market City Mall, Bangalore!!


We opened our 5th store in Bangalore this past Sunday in one of the most popular and well done malls in city, Phoenx Market City. We're thrilled to be part of such a exciting venue and our store was primed to the fullest for all the craft lovers in the city. 


We had reams and reams of paper on offer, in a variety of colours, sizes and finishes, all in our fabulous paper stacks all against one wall of the store. 


Our revolutionary bead bar covers the entire back wall of the store, this is just a glance at one section of it. Jewellery enthusiasts can pick and choose the bead so their choice and pay by the gram.


I was there as always to demonstrate die cutting and embossing. Curious and intrigued shoppers sat to view how the brand new Teal Big Shot works with some superb Spellbinders Dies and ItsyBitsy Embossing folders.


Kids and youngsters had a ball, perusing through all the fabulous craft supplies on offer. Our Christmas range as well was in full swing with trees, ornaments and decorations right at your fingertips.


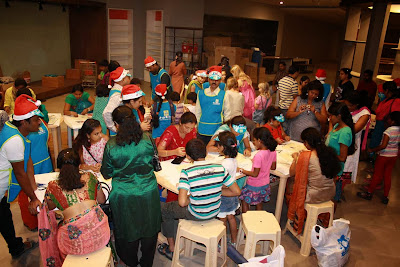
As with all our new stores, we launched it with a slew of workshops for our lucky shoppers. Across the corridor in a borrowed space, we set up the demo stations and as you can see, this was bustling with activity all through the day


It's always a delight to shop at ItsyBitsy whether on opening day or any other day of the week. Very few people are able to leave without filling their baskets because the products are just irresistible. I myself had a basket that was overflowing before I decided to call it a day and head back home.

We hope to see you at the Phoenix store very soon and we guarantee you, it will be an experience for the memory books!