Showing posts with label micro beads. Show all posts

Monday, June 26, 2017

MERMAID'S WORLD - Altered Mixed media work on Old Note book.

Hello Crafty peeps,

  Roshini here today with you to share one more mixed media project. This time my take on Mixed Media is to alter an old note book.

Please have a look at the pictures.


We usually use chalk paints to revamp our furniture or old decor items to add a new look. 
My theory was same, but I used chalk paints to revamp my old note/journal book. This can be framed or just hung on the wall.


I have added sea shells, mini texture stones and Hearty Melange.... etc. to give it an under sea feel.


I have added textures with gauze cloth and twine, used silicon glue to stick them to the base.

 The embossed look on the 3D chipboard frame is due to the details added with ceramic cone and dotties.


There are endless possibilities with chalk paints. They are not just limited to painting on wood and bottles or home decor. They are so versatile and can also be used for mixed media projects too.

 You just have to dilute the chalk paint a little with water to make
 it flow like other paints and sprays.


Supplies Used:


Sailing Sky
Wild moss


Chipboard - 3D Charisma Ornamental 1pc
charisma
golden hearts


Silicon glue 
sea shells


sea shells
       
                      
white gesso


Friday, September 9, 2016

"Home is where I am with you" - A Mixed Media Layout

Hello Friends,

Remya here with a mixed media layout.

What is mixed media? For me; it is a place where we can use available mediums and embellishments to create something beautiful, which you would cherish.


Here a cake base has been recycled. It can be painted using Paint brush and acrylic paints. But this time I tried out Spray paints from Itsy Bitsy. Itsy Bitsy has got a wide variety of spray paints and I chose brown to get a rustic feel. You can see it has given a rustic look to the background all together. 


Caution : A point to be noted while spray painting is to ensure that you paint only the substrate and not the grills and surroundings as I did. :) Keeping couple of sheets of newspaper behind would really help the cause.

Next came the background papers. I chose a vintage brown colour - Burnt Sienna to go well with the rustic texture given to the background. Tore the edges randomly and dabbed with brown acrylic paint. This gives a burnt look to the edges. Wound twine around the length of the paper for a texture.


In search of a focal picture , I ended up with a cute little picture of Mom and Daughter. I decoupaged it to a canvas board. The  edges were again dry brushed using Mont Marte Dimension paint  ( Pearl Yellow). This is one paint I would recommend all of you to try. The rich , creamy , velvety paint will steal your heart away. It gave such a golden shimmer that I ended up smudging the edges of my background Pattern Paper too.


Once the base was finalized I stuck them up together using silicon glue. Now this glue has become my "all time" favorite. I lost track of the things I have fixed using it. 


Now lets move to the embellishment part. Everyone those who have visited Itsy Bitsy would agree with me that we are spoiled by choices on the varieties of embellishments it has in store. Wanting the substrate and the embellishments to be in perfect sync with each other, gave a coat of dimension paint to the chip boards (flowers and damask) too. 


Flowers are something to die for. Itsy Bitsy has a huge collection of flowers, again spoilt by choices available. I arranged them till I was happy with it. Stuck them up with the Silicon Glue. Even gave a sprinkle of micro beads for the rustic effect.


A few close up pictures given below for you all to see the details.


Hope you all enjoyed this detailed picture heavy post till the end. See you soon with something new a wonderful .

Materials Used :


Hugs

To check my previous blog posts with Itsy Bitsy - click here


Tuesday, August 23, 2016

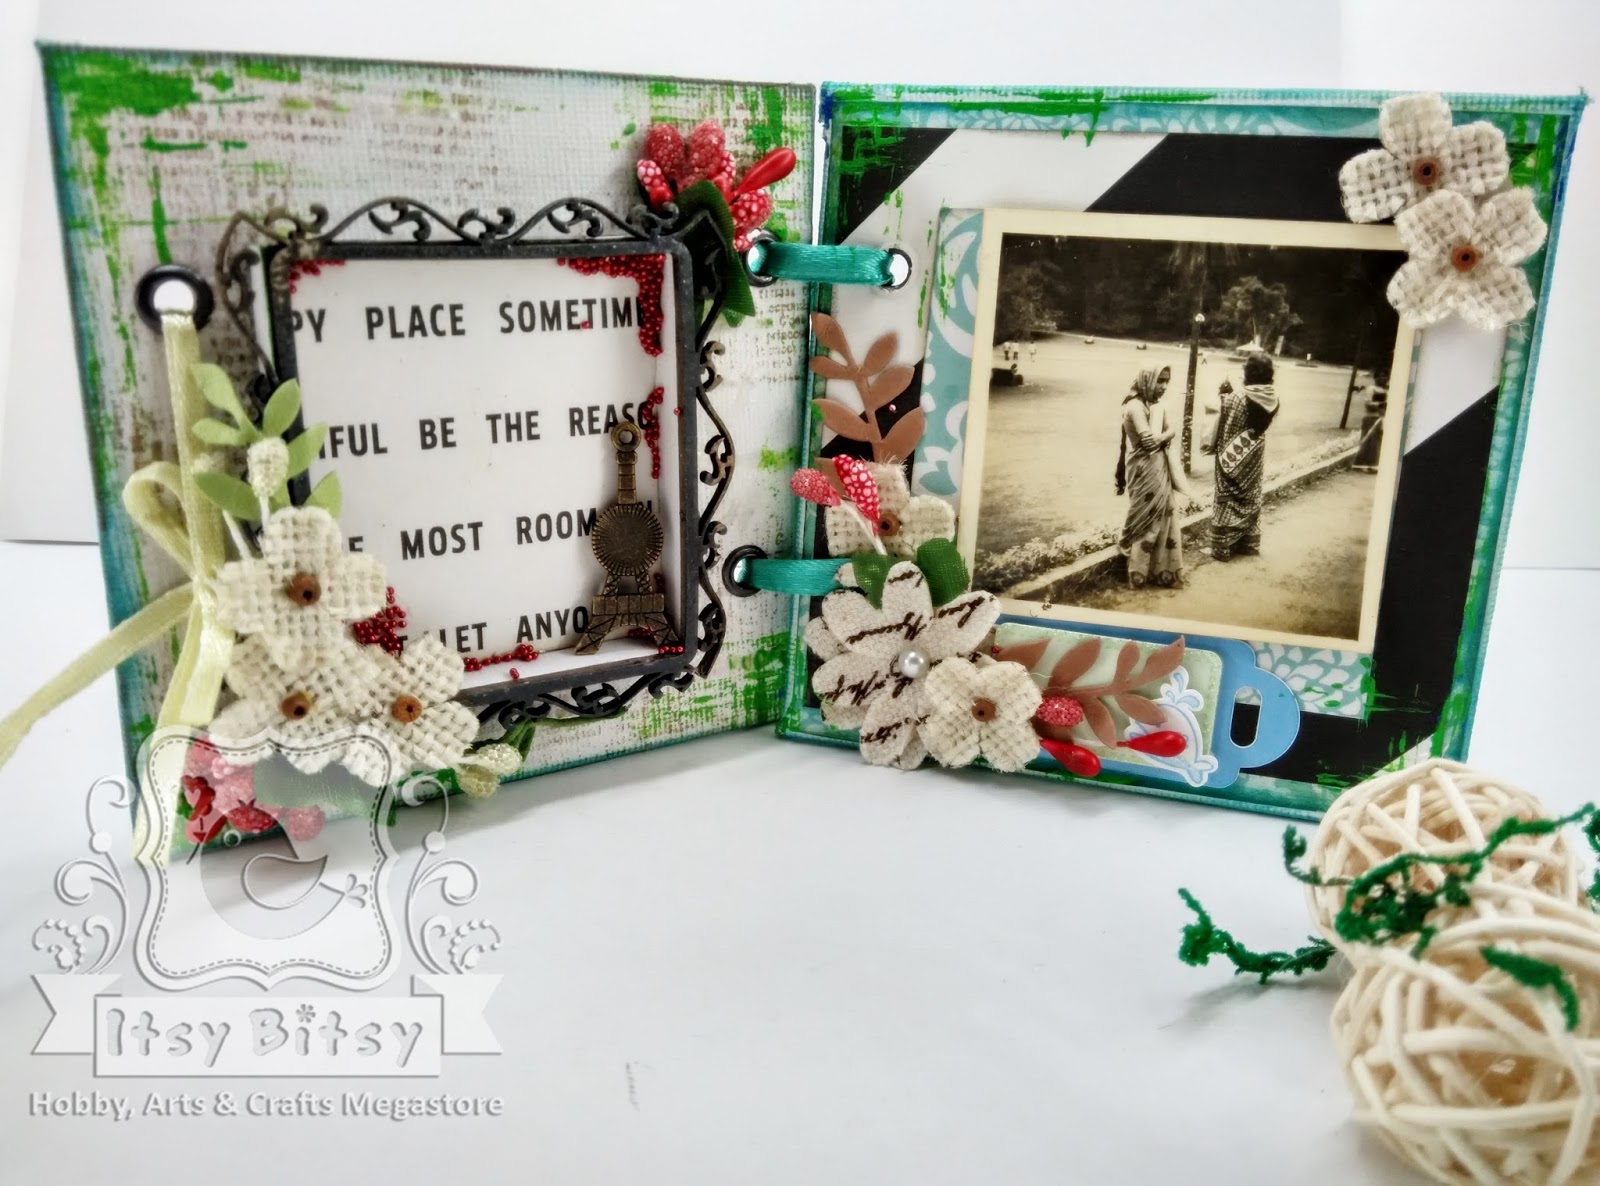
Dual-fold Photo Frame

Fellow Crafters,

Over ages, Canvas boards has become synonymous with paintings. Right? Lets think out of the box, step aside for a while, away from "general practice" and use it for something different. Today, I have made it into a dual-fold Photo frame
Here below, I would try to narrate on how to transform couple of canvas boards into a Dual-fold Photo Frame.

Step 1

Take two  Mont Marte Canvas Boards measuring 4 x 4 inch.


Measure 1.5 cm from the side and 2.5 cm from the top and bottom.  Punch 2 holes at the intersecting point using We R Memory Keepers Crop-A-Dile. I have started to enjoy using this We R Memory Keepers Crop-A-Dile on any substrate I put my hands on - really am in love with it. Punching through Canvas can be a bit scary, be rest assured it punches even canvas boards :)


Step 2

Stamped Script text Stamp on the Canvas using Versa Colour pigment Ink Pad - Brown . Pigment inks will stay wet for a long time, hence need to be patient with it till it dries up. You can also use heating tool if you are a bit impatient like me. Once the Pigment Ink dries, gave a texture with Mont Marte Dimension Paint -Green using chipboard piece and using its edge to dab the paint around.

NB: Itsy Bitsy has launched real pretty Stamps. Worth collecting all of them ! 


Till this dries up, let's prep up the chipboard embellishments. I love to give a dimension to the embellishment. Gave a coat of Mont Marte Dimension paint on Square Deco Frame chipboard. I wanted a black shade, but not true Black. So first a coat of Green and Blue mixed together over it. The dimension paint from Mont Marte gives a dimension to the chipboard surface which I love.


Step 3

Place this frame on the canvas on an elevation. Yes! You heard it right - we are going 3D. This elevation is made so that some keepsake can be kept in it. I cut 4 pieces of chipboard (measuring the length and breadth of frame), placed it around the edges of the frame and stuck it to the canvas. Before sticking , I cut a small piece of pattern paper which became my base. This paper stack has lovely paper collection. Do have a look into it .

Step 4


For the second canvas, Chose a pattern paper with blue shades. Made a frame by cutting out a square from the center. Glued it on 3 sides so that you can slide photos from the top.

Step 5

Now we decorate it with canvas flowers. These Flowers are so pretty that it was really hard for me to use it up. But now my frames were looking even more lovely.

Step 6

To make this to stand and fold up , tie ribbons through the eyelets punched. To add more interest to the elevated frame, I put micro beads(red) randomly on to the sides.

Hope you all enjoyed this tutorial.

Materials used :

Mont Marte Canvas Board

Square Deco Frame chipboard
Script text Stamp 
Pattern Paper
Versa Colour pigment Ink Pad - Brown
Heating tool 
Mont Marte Dimensional paint  : Green and Blue
Canvas flowers
Micro beads(red)
and ....  We R Memory Keepers Crop-A-Dile

Love
Remya

To check my previous blog posts with Itsy Bitsy - click here