Showing posts with label Eyelets. Show all posts

Thursday, March 30, 2017

Crafter in The Spotlight 43 - Itsy Bitsy

Hello arty-crafty folks,

Thursday is here again! Today I will introduce you to another passionate crafter for our weekly ‘Crafter in the Spotlight’. This week the lime light is on Riddhi Jani, a talented crafter who is originally from Ahmedabad, residing in Pune but is soon moving to the ‘City of Dreams’… Mumbai!!

Riddhi has completed her B. Sc with Biotechnology and feels that art runs in her blood. She loved painting since childhood but never imagined she would take up crafting as a career.

Some of Riddhi’s favourite are scrapbooking, paper crafting and mix media. She feels, Itsy Bitsy offers the best price and is the perfect place for craft shopping.

How did Riddhi get into crafting, what inspires her, what are her tips for fellow crafters, her favourite quote, how would she contribute to the crafting world if she had magical powers? Read answers to all these questions, discover more about her interesting journey and catch a glimpse of a step by step project by Riddhi in this interview. Don’t forget to leave your comments for her.

Here are excerpts of my interview with Riddhi Jani:

Rashmi Closepet, MD, Itsy Bitsy: Tell us a bit about yourself & your background?
Riddhi Jani: Hello everyone! Thanks Rashmi ma'am and Anitha ma'am for this wonderful platform. I'm grateful that Itsy Bitsy gave me this chance.
Before I tell you something about myself, I would like to thank Itsy Bitsy for choosing me. It’s like a dream come true ❤.  I'm Riddhi Jani from Ahmedabad but right now I am in Pune. Most probably I will be shifting to Mumbai this week end. Though I have completed B. Sc with Biotechnology, art is in my blood. I can't stay without craft. I like o paint, sing and a dance a bit as well. Hey, forget to tell you that I'm a big big panipuri fan....lol 😜. I love to listen to music when I'm alone. Mostly, I like listening to slow songs with deep meaning.

RC: How did you get into crafting?
RJ: From my very childhood I loved to paint...But frankly telling you guys, I never imagined it as a career. It’s only possible because of my loving husband and mummy (mom-in-law). Without them, it would not have been possible. Really, words cannot explain the importance of craft in my life. I just can't stay without craft. I think every craft-y person feels like I do. Right guys?  

RC: What is your favourite type of craft?
RJ: Hmm...Mainly, I like to do scrapbooking and paper crafting. But I like to work with mix media projects also. 

RC: What are your favourite products at Itsy Bitsy?
RJ: Itsy Bitsy is like a perfect place for crafty shopping and with best price 😊. Though I love each and every product from the store, my favourites are Flowers, DCWV papers, Jute sheets and Butterflies.

RC: If you had magical powers, how would you contribute to the Crafting world?
RJ: If I had magical powers, I would like to change some thoughts about art in common people who do not value art and artists. Artists obviously work for money but more than that, artists want true appreciation. Am I right guys??

RC: Your prized possession in your craft stash from Itsy Bitsy?
RJ: All the flowers, pattern papers and stickers❤

RC: How would you describe your style of crafting?
RJ: I will call it unique ❤ as I believe all craft-y folks have their own style...and they are unique in their own way ðŸ˜Š

RC: How do you organize your time for crafting?
RJ: I really wish I can craft all day...I have a little boy who is 18 months old. So, I only craft while he is sleeping. Therefore I can hardly craft for 2-3 hours. At this stage my family supports me a lot, if my baby wakes up, mummy or my husband handles him so I can complete my projects ðŸ˜Š It really means so much to me. ❤

RC: Tips for people who want to craft
RJ: Craft from the heart guys…It’s not about crafting…I think it's about crafting with feelings ❤

RC: Your all-time favourite quote?
RJ: "Difficult roads often lead to beautiful destinations ❤"


Here is a gorgeous project by Riddhi & step by step description:

For the project you need all this stuff which is in the image.


Step-1
Take 4 ice cream sticks and fix them with the help of any strong glue.

Step-2
Fix 2 more sticks on top of the 1st layer. Then take 4 more sticks and arrange 3 of them in same line and cut 1 ice cream stick in to 3 parts. Then fix it just as shown in the image.

Step-3
Arrange it as shown in image. So it will make a little stand for our frame.

Step-4
Pick a colour of your choice. As I'm using one of my favourite colours from the store only. Let it dry, then, stick pattern paper to give the background a nice look.

Step-5
Give a little bit of shading on the first layer of the colour. I am using this pretty sentiment sticker from the store.


Step-6
Pick choice of flowers. I feel incomplete without flowers for my projects. Thanks Itsy Bitsy for the wide range of flowers within budget. I love them 😄


And yes it's ready!!! ðŸ˜„


Here are a couple of Riddhi's other awesome creations:


Many congrats Riddhi for being the CRAFTER IN THE SPOTLIGHT – ITSY BITSY!!


You will receive Rs.500/- Itsy Bitsy gift voucher ðŸ˜ŠðŸ˜Š & a Crafter in the Spotlight badge, which can be proudly displayed on the side bar of your blog and other platforms. Looking forward to many more creations, Happy Crafting!

Thursday, March 23, 2017

Crafter in The Spotlight 42 - Itsy Bitsy


Weeks roll over so quickly, it’s Thursday once again and time to take a peek into another crafter’s story and her creations. Today I will introduce you to our weekly ‘Crafter in the Spotlight’. This week our talented crafter in the limelight is Rutuja Paranjape.

Now a full time mom, Rutuja is an MBA in Finance and has also worked as a graphic designer for a while. Even as a school girl, Rutuja always had a passion for art and craft.

She simply loves shopping from Itsy Bitsy and still remembers her first shopping experience from the store. Itsy Bitsy handmade flowers are among her favourites but she admires all kind of merchandise available at Itsy Bitsy.


How did Rutuja get into crafting, what inspires her, what are her tips for fellow crafters, her favourite quote, how would she contribute to the crafting world if she had magical powers? Read answers to all these questions, discover more about her interesting journey and catch a glimpse of a step by step project by Rutuja in this interview. Don't forget to leave your comments for her.


Rashmi Closepet, MD, Itsy Bitsy: Tell us a bit about yourself & your background?

RP: I would really like to thank Rashmi Ma’am, Anitha Ma’am and team Itsy-Bitsy for selecting me as ‘Crafter in the Spotlight’ for this week. I am Rutuja Paranjape. I have completed my graduation in Commerce and pursued MBA in Finance. Speaking about my career, I was into the finance sector for a few years and I also got an opportunity to work as a graphic designer for a brief period. I left my job when my daughter was born and have been a full time mom and a crafter since then.

 RC: How did you get into crafting?

RP: Art and craft was something I have always liked. Back in the school days it was drawing, sketching, painting, knitting that I always enjoyed. I used to make cards for family and friends. But I will have to be thankful to my daughter, because of whom I had to take a break from my career and was introduced to this wonderful world of paper crafting. I am also thankful to my husband, who has played a very important role in motivating me to get into crafting.

My first ever craft shopping was from Itsy Bitsy, and I still remember how excited I was to get the stuff which was so quickly delivered to me!

 RC:   What is your favourite type of craft?

 RP: Scrapbooking and card making top my list of favourites in paper crafting. However, I am very keen to try my hands at mix media.

 RC:   What are your favourite products at Itsy Bitsy?

 RP: I love all the products at Itsy Bitsy......Stamps, Embellishments, Laces, Ribbons, Sprays, Stencils, Dies, variety of Pattern Papers and the list goes on. But my top favourite has to be the beautiful and gorgeous collection of handmade flowers. I just can't resist buying them whenever I visit the online store. I love all the products, they are so reasonably priced!

RC:   If you had magic powers, how would you contribute to the crafting world?

 RP:  If I had magical powers, I would definitely want to open more Itsy-Bitsy outlets and make the awesome crafty stuff easily available to all.

 RC:   Your prized possession in your craft stash from Itsy Bitsy?

RP:    It definitely has to be my huge collection of handmade flowers! I always make sure to keep refilling and never run out of stock.

 RC:   How would you describe your style of crafting?

 RP:    I would say creative and simple would be my style. I try to make every project different from the other and I like to keep it simple.

RC:   How do you organize your time for crafting?

 RP:   I get time to craft when my little one is off to playschool. Sometimes, I also love crafting late at night. 

 RC:   Tips for people who want to craft.

 RP:   To all the people who want to craft, never doubt yourself, always be open to learning and trying out new stuff. Remember, unless you make it, you wouldn't get better at it, so keep crafting!

RC:   Your all -time favourite quote?

 RP:   My all time favourite quote is, “You are never too old to set a new goal or dream a new dream.” So always dream and work hard to pursue your dream. This is what I firmly believe in. 


 Here is a gorgeous project by Rutuja  & step by step description:

Here is a step by step tutorial for a Tag using supplies from Itsybitsy

First I coloured the tag with distress ink. Used a stencil to create a pattern over it, with another colour.


Then I stamped the sentiment and embellished the tag with a chipboard frame, flowers, lace and rhinestones


Finally, I punched a hole and fixed an eyelet for tying the ribbons and laces to the tag.


Here are a couple of  Rutuja's other awesome creations:


Many congrats Rutuja  for being the CRAFTER IN THE SPOTLIGHT – ITSY BITSY!!


You will receive Rs.500/- Itsy Bitsy gift voucher ðŸ˜Š ðŸ˜Š & a Crafter in the Spotlight badge, which can be proudly displayed on the side bar of your blog and other platforms. Looking forward to many more creations, Happy Crafting!

Tuesday, August 23, 2016

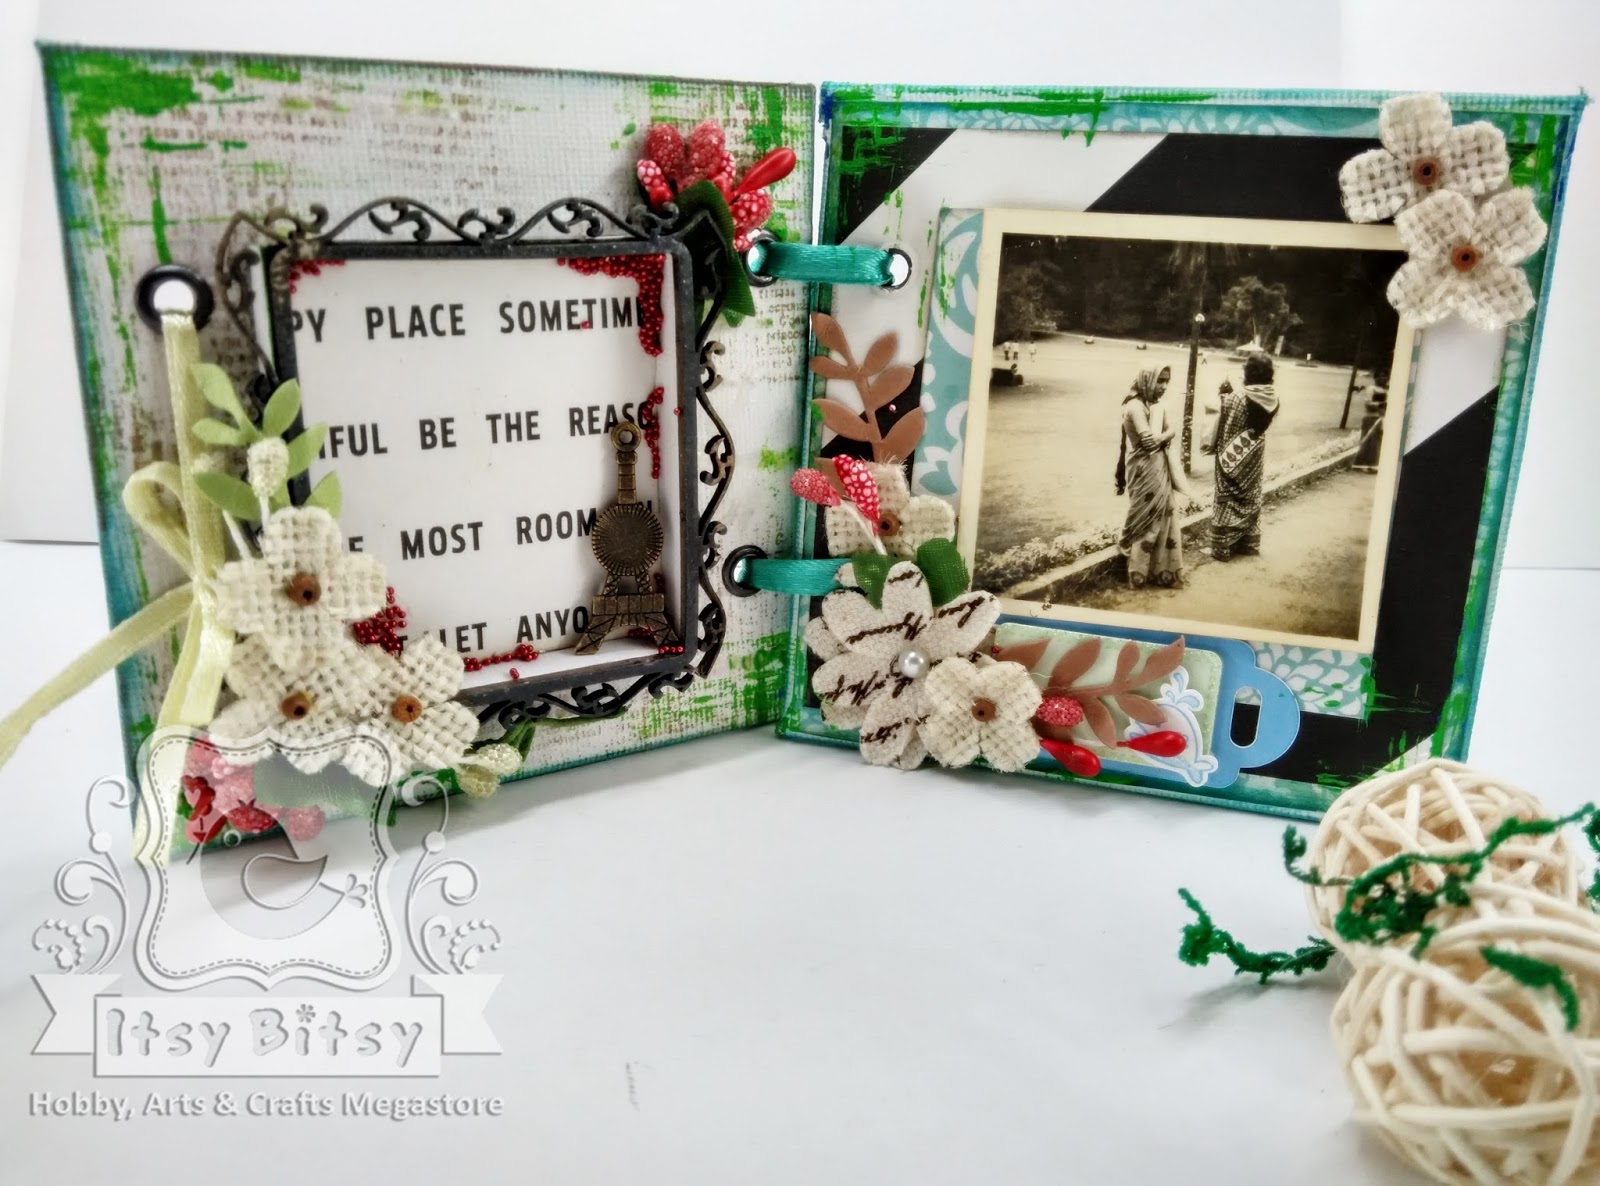
Dual-fold Photo Frame

Fellow Crafters,

Over ages, Canvas boards has become synonymous with paintings. Right? Lets think out of the box, step aside for a while, away from "general practice" and use it for something different. Today, I have made it into a dual-fold Photo frame
Here below, I would try to narrate on how to transform couple of canvas boards into a Dual-fold Photo Frame.

Step 1

Take two  Mont Marte Canvas Boards measuring 4 x 4 inch.


Measure 1.5 cm from the side and 2.5 cm from the top and bottom.  Punch 2 holes at the intersecting point using We R Memory Keepers Crop-A-Dile. I have started to enjoy using this We R Memory Keepers Crop-A-Dile on any substrate I put my hands on - really am in love with it. Punching through Canvas can be a bit scary, be rest assured it punches even canvas boards :)


Step 2

Stamped Script text Stamp on the Canvas using Versa Colour pigment Ink Pad - Brown . Pigment inks will stay wet for a long time, hence need to be patient with it till it dries up. You can also use heating tool if you are a bit impatient like me. Once the Pigment Ink dries, gave a texture with Mont Marte Dimension Paint -Green using chipboard piece and using its edge to dab the paint around.

NB: Itsy Bitsy has launched real pretty Stamps. Worth collecting all of them ! 


Till this dries up, let's prep up the chipboard embellishments. I love to give a dimension to the embellishment. Gave a coat of Mont Marte Dimension paint on Square Deco Frame chipboard. I wanted a black shade, but not true Black. So first a coat of Green and Blue mixed together over it. The dimension paint from Mont Marte gives a dimension to the chipboard surface which I love.


Step 3

Place this frame on the canvas on an elevation. Yes! You heard it right - we are going 3D. This elevation is made so that some keepsake can be kept in it. I cut 4 pieces of chipboard (measuring the length and breadth of frame), placed it around the edges of the frame and stuck it to the canvas. Before sticking , I cut a small piece of pattern paper which became my base. This paper stack has lovely paper collection. Do have a look into it .

Step 4


For the second canvas, Chose a pattern paper with blue shades. Made a frame by cutting out a square from the center. Glued it on 3 sides so that you can slide photos from the top.

Step 5

Now we decorate it with canvas flowers. These Flowers are so pretty that it was really hard for me to use it up. But now my frames were looking even more lovely.

Step 6

To make this to stand and fold up , tie ribbons through the eyelets punched. To add more interest to the elevated frame, I put micro beads(red) randomly on to the sides.

Hope you all enjoyed this tutorial.

Materials used :

Mont Marte Canvas Board

Square Deco Frame chipboard
Script text Stamp 
Pattern Paper
Versa Colour pigment Ink Pad - Brown
Heating tool 
Mont Marte Dimensional paint  : Green and Blue
Canvas flowers
Micro beads(red)
and ....  We R Memory Keepers Crop-A-Dile

Love
Remya

To check my previous blog posts with Itsy Bitsy - click here

Monday, July 4, 2016

Galvanized Pail Favors

Fellow Crafters,

Remya back on a Monday morning. Hope you all had a great refreshing weekend. Its July and we have already crossed into the second half of 2016.

You would have faced a situation where you had difficulties in finding a gifting option to your near and dear where you wanted to have a product of yours - beyond a decorative item gifted. I have faced this multiple times.

Here below is something that I made using Galvanized Metal Bucket. Also have attempted to depict the usage of We R Memory Keepers Crop-a-Dile usage beyond paper and card stock.

Here below is the "Galvanized Pail Favor" which I made over this weekend.


Step 1


As in any media, getting the product ready for "Decoupage" is necessary. So gave a few generous coats of White Gesso on my substrate. 


Step 2


Decided on the Decoupage Paper to be used. Glued it on to the Galvanized Metal Bucket using Decoupage Glue - Matt


Step 3


Gave a coat of acrylic yellow green shade inside the Galvanized Metal Bucket. 
The heart shaped cut on the Galvanized Metal Bucket along with the green paint inside gives you am illusion of a cardstock stuck on to it. Looks tricky ?


Step 4


Once the paint and glue dried,made 3/16" sized holes which were spaced 1.5" apart. Back with Eyelets to reinforce the holes and give a contrasting color to the combo.


You may think of punching holes first into the substrate first and then proceeding further. But would always recommend to punch the holes after the paper has dried up to avoid paper peeling off at the holes.


Step 5


Decorated the product with some flowers - This I would leave it open for your ideas and taste. I used Silicon Glue to stick embellishments on to metal base. You can also give a three dimensional effect to the project (if not already one) by increasing the quantity of the Silicon Glue.


The Final Product can be used as favors , decoration set, indoor planters, Candle holders and what not ! Let your creativity go wild ! 

Materials Used.
  1. Galvanized Metal Bucket
  2. White Gesso
  3. Decoupage Paper
  4. Decoupage Glue - Matt
  5. Acrylic yellow green
  6. We R Memory Keepers Crop-a-Dile
  7. Eyelets
  8. Satin ribbon
  9. Flowers - 1
  10. Flowers - 2
  11. Floral Brads
  12. Pollen
  13. Silicon Glue
Another Crop-a-Dile project and some of its best practices are here in my previous Itsy Bitsy tutorial.

Happy Crafting !!

Love,
Remya