Showing posts with label shaker. Show all posts

Friday, January 20, 2017

Easy Butterfly Shaker Card

Hey there, it’s Juhi with my first post as an Itsy Bitsy Design Team Member. I’m super excited to be a part of this talented team. In today’s post I’m going to show you how to make a shaker cards using Itsy Bitsy’s newly released Shaker card elements line of products. Before we get started with the card let’s talk a little about what exactly are shaker cards.
Butterfly shaker card

What are shaker cards :

Well, shaker cards are cards with a shaker element on them. Accents/embellishments on the card will move around when you shake the card, hence the name ‘shaker card’. The moving elements could be sequins, tiny beads or anything small, non-bulky and light weight. These are usually kept in place under a piece of acetate or transparency.
Shaker cards are interactive and fun; they have been around for some time now and they surely are here to stay! Making a shaker card is not as difficult as it may seem, they usually involve cutting out a window of the desired shape on the card front, adding a layer of acetate below it, and sealing the shape with foam tape to hold the sequins in place.
So without further delay let’s see how to make a shaker card using Itsy Bitsy’s Shaker Card Elements. The Shaker Card Elements are just perfect for making awesome looking shaker cards and what’s more they are incredibly easy to make. So let’s get started

You will need:

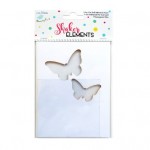
  • Shaker Element Wings of Beauty 
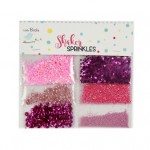
  •  Shaker Sprinkles in a color of your choice
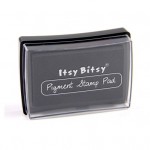
  •  Black pigment ink for stamping (optional)
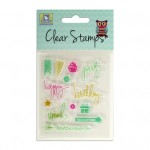
  •  Happy Birthday Sentiment stamp (optional)
  •  Liquid PVA glue

Scroll to the bottom of this post for a complete list of products along with links.
The Shaker Element pack contains – 1 prefolded cardstock base, 1 piece of acetate, 1 double sided foam adhesive sheet pre-cut to the shaker shape, 1 pre-cut top panel for the shaker card.
I began by inking up the top panel for some added interest.
I then flipped it over and applied liquid glue around the butterfly shape and placed the acetate sheet on it.
Peel the paper backing off from one side of the pre-cut self-adhesive foam and stick it onto the back of the front panel above the acetate sheet.
Pour the sequins into butterfly shapes, take care not to fill too much, the sequins, beads and sprinkle should have enough space to move around. I used pink Shaker Sprinkles from the Itsy Bitsy store, each pack of Shaker Sprinkles comes with 6 packs of beautiful, color co-ordinated sequins, and beads which you can mix to create your own custom shaker card sequin mix and what’s more, each pack of Shaker Sprinkles will last you through multiple shaker cards.
Now peel the paper backing off the foam carefully, holding the panel in place.
Cover up the butterfly shapes with the sequins in them with pieces of pink paper big enough to cover each butterfly completely. Press hard to ensure there are no gaps.
Flip and stick the panel onto the cardstock base. I trimmed my front panel a bit from all sides so that it was a little smaller than the cardstock base. I also used a pink card base instead of the white one that comes with the kit.
I finished my card by stamping “Happy Birthday” and adding a few sequins.
Now wasn’t this easy? So go ahead make one and impress your friends and family!


Supplies used:


Friday, June 17, 2016

Design team reveal with a Bloghop & Sizzix Challenge

Hi Friends & a happy Friday from me, Rashmi.
As I have announced on our facebook page we have relaunched our blog too. We are now ready to reveal our first ever DESIGN TEAM! Yes, we had an overwhelming response to our DT call & believe me, it was a tough decision to short-list & finalize the team of uniquely talented crafters.  TANVI SHAH, a well-known name in the crafting circles will be our blog coordinator! She loves everything about papers, it’s colours, patterns, textures & I am not surprised she calls herself  “A paper hoarder who has metamorphosed into a paper Crafter!"  :-)
Although a microbiologist by academics, researching on papers is what Tanvi loves & cherishes! We warmly welcome her on board!


We have tons of activities, events & surprises lined up for our crafters, so stay tuned & follow us to get regular updates.
 Over to Tanvi now!
Thank you Rashmi for this opportunity, it’s a pleasure working with Itsy Bitsy!
We have five members including me joining the first ever – ITSY BITSY DESIGN TEAM. They have been working secretly for the past few weeks & we are now ready to reveal the team. Well not yet……how about a BLOGHOP & a CHALLENGE as we introduce them & a chance to win SIZZIX DIES along the way? 
Hang on with me through the post to read all the details & you could win a brand new sizzix die.

BLOG HOP DETAILS

We will be hopping from today - June 17 – June 30, 2016 


To join the blog hop -
  1. Become a follower of our blog (its rather simple – just use your gmail account)
  2. If you have a blog display the Blog Hop Badge given above prominently on your blog and link it back to this post. 
  3.  Share this post as public on facebook
  4. You can join us even if you do not have a blog - share this post on facebook as public & add that facebook link to the linky tool below.
  5. Follow us on Facebook, Instagram & You tube.
  6. Leave a comment on each team member’s blog and on the Itsy Bitsy blog here as well to be considered for the giveaway.                                                                                          
  7. To make it a lot more fun we have giveaways on each blog & one lucky winner on the Itsy Bitsy blog. So hop along!
  8. We will hop between June 17 – June 30, 2016
  9. Winners will be announced on July 2, 2016.
  10. Please note the DT links will be activated only as we reveal the team. This is the bloghop order –            
ITSY BITSY - you are here
TANVI
SHARADA
GOPI
LEKHA
REMYA
We have tons of new sizzix products uploaded in the store, hop over to the link HERE to shop!


LUCKY WINNER OF THE BLOG HOP WINS THIS ADORABLE SIZZIX DIE 
Hop over to my blog & I will giveaway a sizzix die too!

To join comment below & add your details in the linky -  


DETAILS OF THE CHALLENGE

THEME - ANYTHING GOES USING A SIZZIX DIE OR EMBOSSING FOLDER
1.   Become a follower of our blog (its rather simple – just use your gmail account)
2.   Follow us on facebook
3.   Follow us on Instagram (@itsybitsycraftstore), twitter, you tube & pinterest.
4.   To qualify your entry can be anything as long as you use a SIZZIX die/stamp. Please mention in your post the SIZZIX product used.
5.   Entries can be submitted until 16th July 2016.
6.   Following this we will announce a WINNER using a random draw & Top 3 will be chosen by the DT.
7.   In order to submit your entry, click on the inlinkz button provided at the end of this post, add your image and link to your blog post containing the submission.
8.   In your blog post mention clearly the sizzix die or embossing folder used & create a link back to this page.
9.   Each participant can submit a maximum of 3 entries.
10. All submissions must be new & no backlinking.
11. Entries are welcome from all over the world however if you are a winner, we can only ship your prize to an Indian address.

Sizzix Bigz dies are heavy duty dies suitable for a wider range of  materials besides paper. Whether you are a scrapbooker, card maker or just love crafting, these are a must have in your papercrafts arsenal. Compatible with Big Shot & Cuttlebug machines. These dies cut effortlessly!


I created a shaker card using the floressa die.


You can also use these to make some quick hair clips, brooches, bookmarks, etc.


Now lets see the die you can win by entering the challenge -


Looking forward to seeing your creations!! Good Luck!

Add your creation to the linky below -

Remember to tune in tomorrow as we introduce our next design team member!

Thank you for stopping & hopping along with us today :)