Showing posts with label Buttons. Show all posts

Tuesday, April 28, 2015

Spectacular Wall Art with Itsy Bitsy Metallic Paints and Alcohol Inks.


Hi Folks! A very good morning to you!! Hope you are having a great week. Itsy Bitsy is conducting a series of workshops in the month of April. A couple of our workshops (18th April) had to be rescheduled due to Karnataka bandh. For people who might have missed the workshop, here is a step by step tutorial for a spectacular wall art.


Itsy Bitsy has recently introduced a range of fantastic metallic paints! These come in many lovely shades and in this tutorial we are going to show you a very simple technique to make spectacular wall art using Itsy Bitsy Metallic Paints.  This technique can be used on Stretched Canvas, Canvas Boards, Wooden Boards, MDF or Wooden Alterables. And the best part, no prior experience required!

So let’s get started!
Here is a list of supplies you will need:

  1. Wooden Board  (or Canvas or Alterable of your choice)
  2. Itsy Bisty Metallic paints in your choice of colours.
  3. A flat brush
  4. Heat Tool
  5. Alcohol Inks in your choice of colours – should be darker than the metallic paint
  6. Ink Applicator
  7. Shadow Box (to mount your art)
  8. Petal paper ( or any paper of your choice for background for your art)
Optional:
1.       Jewellery Findings, Jute scraps, Chipboard Shapes, Buttons, Shells, Beads etc.

Method:
On the blank wooden board, stick some skeleton leaves using white craft glue. Try not to spread out the leaves in a definite pattern unless you particularly want that effect.
After the glue is dry, paint the board with the metallic paint. You can paint over the leaves or leave them bare depending on what you want.

While the paint is still wet, apply heat with a heat tool. This will make the paint bubble and dry, leaving a beautiful textured surface.
With an applicator, gently apply brightly coloured alcohol ink on top of the dry paint. This emphasizes the contrast between bumps and shadows, and gives more dimension to your painting. Let everything dry and you are done!!


Mount your canvas or canvas board into a shadow box. Use a contrasting paper back ground to showcase your artwork (shown above)!


 Experiment with different sizes, colours and shapes to get the effect you want.  You can also use this as shimmery, textured painting as a background which can then be decorated and built upon in many different ways!  You glue findings, shells, buttons, twine, jute etc to add more depth to your work. You can also try stamping for adding more interest. Here are a couple of ideas:


Please let us know what you think of this technique and do send us pictures if you try it.
Happy crafting!
Link for Supplies:


Tuesday, April 15, 2014

Baskets for Easter!!


It's almost Easter and whether or not you celebrate it, it's always fun to nibble on an easter egg! Preferably a chocolate one filled with little marzipan treats. I wanted to get in on the easter fun so I decided to make a few baskets that could be used to present easter eggs. And here is my set of Easter Baskets!


Easter colours are the colours of spring - yellows, pinks, greens and more bright shades. So naturally my baskets followed this theme. I found this SUPER easy tutorial online to make the baskets and you have to try it - it's so so so so easy! 


The papers I used for the baskets are all from the DCWV Fresh Floral Stack which is just perfect for Easter!! Full of lovely floral pastels, I went nuts choosing from the designs. Once the basket shell was ready, I added this pretty frill with solid card stock using the Spell binders Asian Accents Die. This die set comes with a border die and some other embellishments. I thought the border worked wonderfully for my project.


Finally to fill the empty space inside the basket I relied on the brand new shredded tissue newly launched at ItsyBitsy. How perfect was it to fill up the space and also provide a nice nesting space for the little chocolate eggs!

Supplies Used

Wednesday, April 2, 2014

A Bright and Happy Baby Layout


I love doing baby scrapbook layouts and with the wonderful dies and papers at ItsyBitsy, it's really a pleasure to put such pages together. I wanted to do a layout for a boy that was not confined to the traditional blue colour scheme. My attempt was to make a cute fun baby boy layout using non-traditional colours. After much trial and error, the colour scheme I selected was red, yellow and white and here is the layout I created. 


ItsyBitsy has this great sailor outfit die that is really quite adorable. You get a t-shirt, a romper and a little sailor hat within the die. I decided to put it to use to create a little clothes line at the top of the page, because nothing says baby like baby clothes hanging to dry. The yellow paper I used is from the DCWV Lemon Flower Stack and and the red paper is from the ItsyBitsy punch paper range. And I hope you didn't miss the cute little heart buttons on the romper!! So adorable right, perfect to complement the heart die cut that came with the sailor suit!


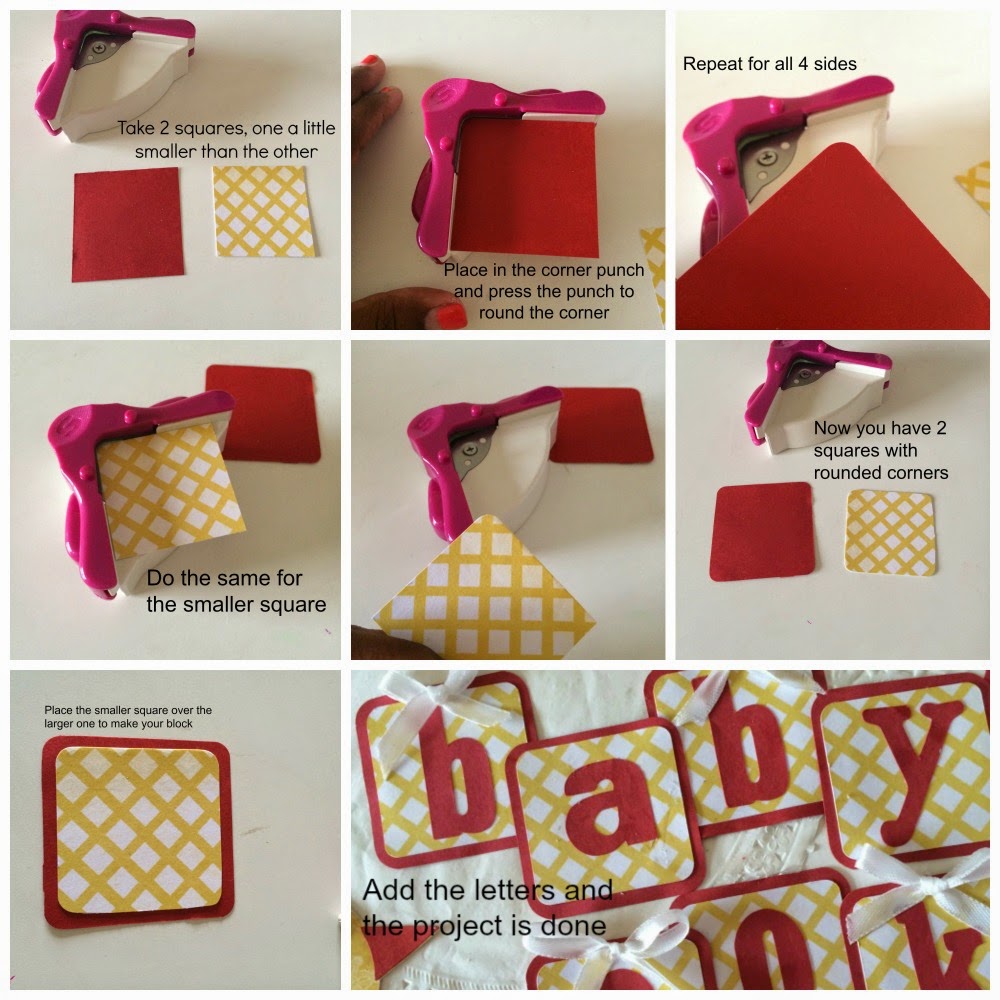
For the baby book text I wanted to create this kind of alphabet block look which was super easy to do. Here's a picture tutorial of how I did it. The letters are cut from the Sizzix Word Play Die and I rounded the corners with the ItsyBitsy corner punch. 

Finally to embellish the side I used the Sizzix Bigz Bird Die which again I think is super cute! All the different elements come in separate dies so that you can cut each in any paper of your choice. It also includes dies for the eyes and eye balls but I decided to go with the buttons which I think look super cute! 


Here's a picture tutorial of how I put one of the birds together. Really straightforward but it gives you an idea of how the die cuts emerge.


How do you like my colours and the little baby elements? Would love to hear from you. Do leave a comment and let me know!

Supplies Used:

Saturday, December 28, 2013

Festive Goody Boxes for Friends and Family


The Festive Season is still going strong and we're loving your entries for our Festive Challenge! I wanted to share something I made for my family and loved ones this year. I needed to make some really festive goody boxes and I didn't have much time to put them together. I ultimately chose this design which was perfect! It was cut out of one piece of card and didn't need an additional lid to be made.


Here's a closeup of box. I made it out of plain white card which I embossed with the ItsyBitsy Spots Embossing folder. Love how it mimics snow fall. I added 2 holly leaves using the ItsyBitsy holly leaf punch and for the red berry, I added a little red button from my Fashion Button pouch. Voila! My festive goody box was done!


Here's a look inside the box. I packed it with 9 mini cupcakes using cupcake liners and moulds that I picked up from ItsyBitsy. These liners are just perfect because the resulting cupcake is just the size of a large mouthful - perfect for a quick bite during the holidays when we're all just stuffing our faces all the time!

Well that wraps up my post! Hope you're having a great festive season and crafting away to glory! Thanks for dropping by!

Supplies Used

Sunday, November 3, 2013

Celebrate Diwali with some Homemade Lanterns


First off, on behalf of the entire ItsyBitsy family, here's wishing all our lovely readers, friends, fans and shoppers a very Happy Diwali! I hope it is a wonderful festival for all and that it brings all the prosperity and good fortune possible! I love lighting diyas for Diwali but often get frustrated when I find the wind has blown off all the pretty flames. So this year I started thinking how I could create something that would preserve the beauty of the flame and sustain it. Here are my creations.


This one is a pretty cube shaped lantern with an open top. Slip in the candle or diya, light it with ease and rest assured knowing that the wind cannot blow it out. And you can seriously go to town decorating it. I started with red card stock and created the cube shape. Then I cut out the sides using the Spellbinders Kaleidoscope die. I added some vellum for a semi opaque look and a few flowers made from the Tattered Flowers Die to adorn the corners. I finished off the lantern with some lovely golden bling. Isn't it lovely! Here's how it looks in the night with a diya inside. Love the warm glow!


For my next lantern project, I decided to try some yarn balls. I've seen them all over the Internet and thought it would be perfect to try them out  as a Diwali lantern. There are numerous tutorials online explaining how to do it and I strongly suggest you watch/ read them before you start. But in a nutshell, here's how you do it.

  1. Blow a large balloon a little so the shape is still round and knot it.
  2. Cover it with Petroleum Jelly or Vaseline
  3. Open out your yarn and soak it in a mixture of PVC glue and cornstarch.
  4. Then wrap the yarn randomly around the balloon.
  5. Leave to dry overnight.
  6. Next day, pop the balloons, ease it out with a tweezer and your yarn ball is ready!


Here's how it looks when a light is placed inside. I tried it with a candle but found the heat was too much and the yarn at the top started burning so NO CANDLES in the yarn ball. Instead, you can add some twinkle lights or battery operated tea lights. The effect will be really pretty and the result the same!


Did you make any Diwali lanterns this year or before? Would love to see your creations. Leave a comment and let me know! Till then - once again a very Happy Diwali!!

Supplies Used

Saturday, September 21, 2013

Cards with Crochet

My love affair with craft began when I was seven or eight years old when my mother introduced me to cross stitch. She taught me the basics and then gave me a pattern book as back then there weren't any stitch kits. I spent hours embroidering little birds and flowers, fruits and designs. Then my mother taught me how to knit, that again became a passion. Later my interests evolved to artwork and painting and now it is paper craft. Through it all, crochet was the only thing I hadn't tried. I was always interested but never attempted it. So when I saw the new range of crochet yarns at Itsy Bitsy, I knew the time for crochet had come. 


I picked up 2 balls of yarn from Itsy Bitsy -  a shaded pink and an olive green. I also picked up some hooks - Itsy Bitsy has a range of crochet hooks with different sizes, I picked the thinnest one as I figured with yarn so thin, the needle had to be thin too. Then I headed over to YouTube. I cannot tell you how many tutorials there are online for different types of crochet projects. There are tutorials on the basics, on patterns, on shawls, scarves, jackets, shrugs, flowers, leaves - my goodness, the list is endless. After watching and practicing, I started getting the hang of crochet. Then I started making the flowers, following that the leaves and in 3 days, my set of crochet flowers were done. Now it was time to put them to use. And being the paper crafting I am, of course it had to be cards. 


Here's a look at the cards I made using my hand made crochet flowers and leaves. I had also just picked up the DCWV French Country Stack which went perfectly with this colour scheme. Since I had made 3 flowers, I decided to make 3 cards and for the first time, I found I was able to put them together fairly quickly. I guess the crochet flowers had inspired me!


For my first card, I used white card stock as the base layer and placed a sheet from the French Country stack on top. I added a final layer of white card stock which I had embossed with a lovely Itsy Bitsy embossing folder. I distressed both these layers using the We R Memory Keepers Sweetheart distressing tool. My crochet flowers and leaves went on one corner and a lovely bow on the opposite one. I finished the card with an adorable Blue Moon scissor charm on my ribbon. Love it to bits!!


My next card had more layers of pattern paper from the French Country Stack. The crocheted rose with accompanying leaves formed the center piece, I gotta say, this flower is my favourite one. I embossed the top layer of white card stock with the Sweet Flowers Embossing folder and added some pretty pink and white roses on the two corners for a really pretty finish. Some randomly placed pearls added to the floral feel and voila, my card was done. 


For my next card, I tried a completely different layout. I used the pattern paper as the base, gluing two pieces back to back. This made it heavy enough to serve as a card base. I filed one of the new rectangular doilies at Itsy Bitsy in half to create a lacy top layer and added a border of pearls on it. My crochet flower went on the centre and the rest of the empty space was filled with die cuts from the Couture Creations Intricutz Die. This card started out looking quite sad but finished up looking the best I think. 


Here are some closeups of the first two cards, to give you a look at the embossing and the detailing in the crochet flowers. I really got quite addicted to the crocheting aspect, found myself at it till 4 am every night. Now that my project is ready I hope I still continue to crochet. 

How do you like my first attempt at crochet? Do you like how I used them in cards? Have you tried crochet yourself? Leave a comment and let me know! Would love to hear all about it. 

Supplies Used

Wednesday, May 29, 2013

A Pretty Girly Dollhouse Part 3 - The Bedroom and The Nursery

I'm back again with the third and final instalment of my crafty dollhouse series. Part one was all about making the house from an old carton. In Part two, I created the furniture for the living and dining rooms using some old match boxes and toilet rolls. Now in Part 3, I'm going to finish furnishing the remaining two rooms of the house. It's time to work on the bedroom and the nursery. So let's get started.


I chose a lacy blue theme for the bedroom. The bed is actually an old pack of breakfast bars that I wrapped with a paper from the Fresh Floral Stack that coordinates with the wallpaper. For the pillows I used some satin ribbon with a pompom filler. For the headboard, I die cut a scallop oval and embossed it with a floral embossing folder and the lamps are all made from the awesome range of Itsy Bitsy jewellery making supplies. I've made a tutorial video for this room which you can watch later on in this post. Here are some closeups of the details. 


Next I began working on the fourth and final room. I really spent some time figuring out what to with this room - study, second bedroom, kitchen... the final choice was a nursery/ baby room. I chose the sunny colours of yellow and once again had a blast adding the numerous details of a typical nursery.  I've had 2 kids and each time there were 2 nurseries, one at my  mom's where I went for confinement and the other at my own place, so I am intimately familiar with the requirements. Here's a glance at the entire room. 


I started with a cream jute sheet as the flooring, the original was a dark brown which I felt would not go with the sunny feel I wanted. Then I worked on the dresser/ changing table. I used a standard box template to cover the entire side of the wall and then created the faux drawers with strips of pattern paper and brads for drawer knobs. I added a lace trim on top and laid out some Itsy Bitsy handmade decals to appear like baby clothes on the dresser. For the lamp on the corner, I created a stand using a headpin and some pearls, glued that on to the yellow button as the base and added some flowers and ribbon around for added style. A cupcake liner formed the lampshade. 


Next I got to work on the cradle. Once again, discarded toilet rolls came in handy. I sliced it in half and then added some toothpicks as legs. For the canopy, I die cut a scallop circle, cut it in half and curved it over the cradle. Some pearls and an Itsy Bitsy doily finished it off. 


I had some fun with the other details in the room. For the wall, I created a mural using some Itsy Bitsy 3D stickers, all in a pretty princess theme. And I also made a little rocking chair. I found a template some months ago on a blog titled Memories by Dawn and bookmarked it. I knew I would try it some day. For the cushion I used some ribbon and an Itsy Bitsy pompom. 


And here's a final look at the completely furnished dollhouse from top to bottom. The pearly pink drawing and dining rooms, the lacy blue bedroom and the sunny yellow nursery. Hasn't it turned out great! All made from paper crafting supplies and a bunch of discarded materials.


As promised, here is a video tutorial of how I made all the bedroom furniture and accessories. Let me know how you like it and would also love to hear your comments on the rooms I furnished here. Thanks so much for stopping by and Happy Crafting folks!


Supplies Used:

Tuesday, April 30, 2013

Money Envelopes - Great for Making a Boring Gift Extra Special


I always feel a little guilty when I gift someone money because it seems like the easy way out - rather than take the trouble to find a really thoughtful gift, I end up giving cash. Well now I found a way to feel better about it - with handmade money envelopes. I mean you can seriously go nuts with them and then suddenly presenting money will actually be a welcome prospect!


My first envelope is a dramatic black one. I found that Itsy Bitsy has launched this new line of masculine coloured flowers aptly titled 'Gentleman'. And I decided to take that colour scheme forward with a whole lot of greys and blacks. What do you think? Does it say drama?


For my second envelope, I kept it simple and just went crazy with the flap. I used Itsy Bitsy's heart lattice punch to create that border for the flap and edged it off with a line of purple pearls. The end result was this fun frilly envelope. Totally love how it turned out!


For my third envelope, I went all soft and summery - after all we are in the middle of a sunny Indian summer right. I used the Cuttlebug Vintage die to cut little panels in the envelope and then trimmed that off with some pretty Itsy Bitsy flowers and pearls. Buttons were perfect for the centre, what do you think?

Have you tried making your own money envelopes? We would love to see. Leave a comment and we'll pop by!

Supplies Used

Wednesday, April 3, 2013

The ItsyBitsy Logo Color Challenge - Paper/ General Crafting and Jewellery Making

Let me take this opportunity to thank all our lovely followers and fans for participating so actively in our Craft Awards last month. Whether you were submitting your creation or voting for your favorite, your particpation made it a resounding success! Stay tuned for the results which we will be announcing very soon.
               
On to our challenge for April and from the image above, perhaps you have a hint of what's in store. We've chosen a color challenge and what better colors to showcase than the ones from our brand new ItsyBitsy logo. The colors are bright green and bright blue so we want to see what you can come with using shades of blue and green. Plus there's more! Starting this month we will be rolling out 2 challenges - one for paper crafters and the other for jewellery makers. The theme is the same for both the challenges - simply use the Itsy Bitsy logo colours - blues/ greens and neutrals.


And here's some inspiration for you. I have made a mini album and based the entire design on the fabulous colors from the new ItsyBitsy Logo. Here's a look at the cover of the album:


As you can see I have used varying shades of the vibrant blue and lush greens from the logo. Pattern Papers from the Fresh Floral Stack offered me just the right background. And who can go wrong with the fantastic ItsyBitsy craft flowers? They're just DIVINE

The central focus of the mini cover is a cuckoo clock cut from the adorable Spellbinders die. And concealed within the cuckoo clock is a secret compartment, great to store charms, rings, bracelets or other trinkets. 


And here's another closeup of the beautiful flowers all from Itsy Bitsy. I have bound the album with the new card rings now available at ItsyBitsy and decorated them with some delightful crochet flowers. So cute! Then since the outside was so elaborate, I decided to go simple for the inside - the picture above is a collage of the various pages.

Moving on to the Jewellery Making Inspiration. This one was put together by the amazing team over at ItsyBitsy and all the beads/ accessories have been taken from the stupendous ItsyBitsy Bead Bar that literally has 1000s of options.


Isn't it gorgeous? The blue and green beads interspersed with silver? Delicate, elegant and such pretty colors - it's a necklace that would suit any neck and the best part is that it's made by a crafter like yourself. Here's a close up of the beadwork.


Here are the rules of the challenge:
  • For the Paper/ General crafting project, your submission can be a card, box, tag, scrapbook layout, dress, embroidery, crochet work etc - anything as long as it is handmade and incorporates the color scheme provided in the logo inspiration picture above.
  • For the jewellery making project, your submission must be some form of jewellery and once again it must incorporate the color scheme provided in the logo inspiration picture above.
  • Quilled jewellery or jewellery made out of paper beads will fall under the Jewellery making category.
  • The contest closes at midnight on 30th April 2013.
  • In order to submit your entry, click on the inlinkz button provided at the end of this post, add your image and link to your blog post containing the submission. There is a separate button for each category.
  • If you do not have a blog, please send in your entry to itsybitsycraftcontests@gmail.com and we will add your submission for you.
  • Each participant can submit a maximum of 3 entries within each category
  • Submitting old projects is not permitted. All submissions have to be created after 3rd April 2013.
  • In your blog post, create a link back to this page - The ItsyBitsy Logo Color Challenge or better still add the Logo Color Inspiration Image provided at the beginning of this post with a link back to this page.
  • Entries are welcome from all over the world however if you are the winner, we can only ship your prize to an Indian address.
  • 2 winners will be selected, one for jewellery making and one for paper/general crafting who will each receive a voucher of Rs. 1000 each, redeemable online at www.itsybitsy.in.
  • In addition 6 finalists in each category will be selected all of whom will receive a badge to display on their blog. 
  • We would love it if you display our new badge on your blog, you can find it on the sidebar.
We are super excited to see what you come up with and judging by the talent displayed in previous challenges we are 100% certain that it's going to be a gala hit! So hurry up and start linking! Looking forward to your creations!

Supplies Used: Click on the link to shop online


Paper General/ Crafting Submissions

Jewellery Making Submissions