Showing posts with label Idea. Show all posts

Monday, July 25, 2016

Mixed Media Layout by Dr. M.V. Pratyusha

Hello Crafty friends, today we have another guest designer at the Itsy Bitsy blog. She is the extremely talented and versatile Dr. M.V. Pratyusha! She is a well-known name in the crafting industry and we are delighted and happy to have her with us today. Quilling is her forte, however, today she has tried her hands on mixed media. Check out the blog to see this amazing creation & please show your love by leaving your valuable comments for our guest designer. 

Over to Pratyusha..

This is a mixed media layout.

Step by step guide by Pratyusha:

First I coated the 12x12 inch chipboard with 2 coats of gesso.

 Used Tim Holtz damask stencil and the crafters workshop Art is stencil to
add in some texture using texture paste. I randomly stamped tim holtz script
stamp using black stazon ink.

Then cut different laces- A white broad one, rhinestone chain and a pink
lower lace to create a cluster in one side of the layout. To make the focal
point I made a cluster using doilies and used a pattern paper which reads
‘our great adventure’ from Poolside ephemera collection. The frame
Chipboard elements and the flowers are also added in.

The whole of the layout is then coated with watered down gesso. To bring the layout to getter I used Viva décor inka gold paints to add in highlights of gold color, violet, purple and pink.

The butterfly used here is a metal embellishment which is coated with gesso and a layer of viva décor inka gold- gold paint is added and buffed.
I then used the alphabet stamps from my stash to write the names to customize the layout!!


Materials used : 

Thursday, July 21, 2016

Crafter In The Spotlight 7 - Itsy Bitsy

Hello friends!! Itsy Bitsy brings you "CRAFTER IN THE SPOTLIGHT" – a unique way of encouraging and appreciating the talented crafters. We recognize talented crafters week after week, turn the spotlight on them & feature them in our "CRAFTER IN THE SPOTLIGHT"! We love what you talented crafters create & are amazed at each of your unique creations every single day! We love the way you use Itsy Bitsy products & give life to those products.

We are very excited to announce this week’s “CRAFTER IN THE SPOTLIGHT” - July 2016 – PRIYANKA JAIN ! We are very excited to announce this week’s “ CRAFTER IN THE SPOTLIGHT” - July 2016 – PRIYANKA JAIN ! Having graduated in Finance, this talented crafter has always loved crafting & in 2011 decided to make it her profession! :-) Art Journalling & Mixed Media are her favourites & her works are very vibrant, colourful & tastefully embellished with her treasured flowers! :-). 
She has been an active participant in Itsy Bitsy Crafters Café & we would love to see many more creations from her in the future! She will receive Rs 500 voucher from Itsy Bitsy & a " CRAFTER IN THE SPOTLIGHT" badge .
CONGRATULATIONS Priyanka Jain! Wishing you loads of success on your creative Journey.


Here are excerpts of my interview with Priyanka:

Rashmi Closepet, MD, Itsy Bitsy : Tell us a bit about yourself, your background? Where are you originally from?
Priyanka Jain : Hi. I am Priyanka Jain, have done my graduation in financial markets. I reside in Mumbai. Have my own gifting business. I love making SCRAPBOOKS cause I love capturing memories.
And as for now I am currently doing my wedding shopping. (lol- getting married in December.)

RC : How did you get into crafting?
PJ : Since a young age, art and craft has always been a hobby and a passion for me.
I had done various crafting classes in my childhood like quilling, origami, papier-mache, drawing, charcoal painting. And I used to make handmade gifts and scrapbooks for my near and dear ones. It was then in 2011, that I decided to take my interest in crafting to a next level and chose to be an entrepreneur with the support of my family.

RC : What is your favourite type of craft?
PJ : I like crafts in which there are no hard and fast rules and regulations. I have always wanted to do what I feel like. So my favorites would be mix media and art journaling. It always comes from your heart.
Just take your brushes and paints and start creating.

RC : What are your favourite products at Itsy Bitsy?
PJ : That’s a real difficult one. Whenever I go to the kurla shop at Mumbai, my fiancé has to literally drag me out of the shop. I love all the products but if I had to choose one it would be the handmade boutique flowers. I seriously hoard them.

RC : What products from Itsy Bitsy do you think are must have’s for a crafter?
PJ : The embellishments, flowers and the chipboards and the paper stack. And their currently added stencils, super favourite!

RC : What product would you like to see at Itsy Bitsy?
Since I love Itsy Bitsy flowers, I would love to see more handmade flowers.
PJ : I would also want to see more mix media products and more distress inks.

RC : What do you do to make your workplace inspiring?
PJ : Art journal quotes as they always inspire me to do a little more. My art journal pages depict who I am.

RC : What are your other interests?
PJ : I am a part time teacher, so I enjoy teaching kids. I also like reading and traveling.
 
RC : If you had magic powers, what would you want to contribute to the Crafting world?
PJ : I would use my magic powers to create more shops and boutiques in India like Michaels, where it would be more easy and accessible for crafters to get all the stuff they desire under one roof.
Or probably create a shop where you get free craft goodies. (lol.. because as we all know crafting is an expensive hobby.)

RC : What is your most treasured possession in your craft stash?
PJ : The Itsy Bitsy handmade boutique flowers. I can never get bored with them. Really my utter favourite. I think I have mentioned it a lot of times now. Lol. It really hurts when I have to part away with my flowers. 

RC : How would you describe your style of crafting?
PJ : I love vibrant colors. Anything that catches the eyes. I also like to form a cluster on my art work to create a focal point.

RC : What do you do when you’re suffering a creative block?
PJ : I would rather take a break, sip a coffee, go out, travel and start with a fresh mind, which surely helps. I would also watch more online videos that inspire me to overcome a creative block.

RC : How do you organize your time for crafting?
PJ : I always used to work post lunch. That’s the apt time for me, as mornings and evenings are a little busy.
But now since wedding is on the cards, I hardly get any time to get crafty. But I promise I will get back on track. Can’t do without crafting. After all, it’s my first love.

RC : Tips for people who want to craft?
PJ : Just follow your heart. Do whatever you like. Create your own signature patterns and style. Get inspired and keep inspiring others.
JUST KEEP SWIMMIMG sorry CRAFTING.
LOVE,
PRIYANKA JAIN.
MY FACEBOOK PAGE: https://www.facebook.com/justforyoucreation/

Here are a couple of Priyanka’s awesome creations :


Many congrats Priyanka for being the CRAFTER IN THE SPOTLIGHT - ITSY BITSY :-) :-)

You will receive Rs 500/- Itsy Bitsy gift voucher :-) :-) & a Crafter in the Spotlight badge, which can be proudly displayed on the side bar of your blog.
Also, visit our Youtube channel to view & to know more about this crafter - https://www.youtube.com/watch?v=SZK6uA7bEiE&feature=youtu.be
Looking forward to many more creations, Happy Crafting!

Thursday, April 7, 2016

Colouring Tips

Hello All!! Welcome to another Itsy Bitsy tutorial. Itsy Bitsy has just introduced Colour Yoga, Colouring Books for Adults - Nature, Geometrical, Damask, Classic and Floral. These books will allow you to start your day most creatively or let you relax after a hard day's work. It's an excellent arena for colour yoga & is an excellent alternative to meditation, letting you relax, de-stress and rejuvenate.

Colour your favourite design using a marker, colour pencil or by combining both. You can also add dimension to your designs with shading. In this tutorial, we shall show easy techniques of colouring using coloured pencils.

But, before we get to that, let us understand colours first.

Understanding Colours :

There are three types of colours –
Primary colours – Red, Blue & Yellow
Secondary colours – Orange, Green & Purple (created by combining 2 primary colours)
Tertiary colours – Yellow-orange, yellow-green, blue-green, blue-purple, red-purple & red-orange (created by mixing adjacent primary & secondary colours).
A tint is a colour plus white & a shade is a colour plus black.
We can further classify colours as warm (red, yellow & orange) & calm colours (green, blue & purple).

So, let’s get started & master this art!!
Materials required:
Colour Yoga Coloring book
Colour pencil – Lemon yellow, orange, light green, cobalt green, red, pink (you can choose the colours of your choice)

Method :
Step 1: Use yellow and orange colour pencils to colour the head of owl. We recommend that you use light pressure and colour in circular pattern. Sharpen the pencil to a fine point and draw very small overlapping circular marks.
Step 2: Colour the entire area as shown using orange and yellow colour gently. The best way to shade is to just alter pressure on your pencil.
Step 3: Using two or more colours and blending it to bring a smooth finish is essential in colour blending technique. In this case, use orange and red colour and blend thoroughly. The trick is to put a lighter shade and then overlap it with a darker colour, burnishing the previous colour. 
Step 4: Colour the flower pink. Darken the shade towards the middle of the flower and shade lighter as you move towards the petals.
Step 5: Intensify shading towards to edges. Try to cover the area smoothly at the light end and then increase pressure as you colour towards the darker end.
Step 6: Colour both the wings yellow followed by 2 different shades of green. Each colour should smoothly blend with the previous shade. Layering darker colours over light or medium shade is recommended as it adds colour and darkens and not vice versa.
Step 7: Use yellow, red and orange to shade the body. 
Relax your way into one of these patterns & you can find yourself twirled together with cords of colours in a fantasy land as beautiful as your childhood dreams. Bid adieu to stress forever with our colouring books. :-) :-)

Links :
Itsy Bitsy Colour Yoga Coloring book - http://www.itsybitsy.in/store/books/colouring-books

Tuesday, March 8, 2016

Vintage Decoupage Coaster

Hello friends, welcome to another tutorial by Itsy Bitsy. Today, we shall make a Vintage themed decoupage coaster. These coasters are an easy DIY, fun to do and takes very little time. This can also be a cute gift :-)


Materials Required:

MDF/Wooden blank
Decoupage Paper
Decoupage glue
Pigment Ink
Foam brush
Sponge
Scissor

Pencil

Method:
Step 1 – Take a MDF Coaster, place it on a decoupage paper & mark the outline
Step 2 – Cut it long the marked line
Step 3 – Apply decoupage glue on the coaster using the foam applicator
Step 4- Stick the decoupage paper
Step 5 – Let it dry, dab the edges with pigment ink to give it a vintage look
Step 6 – Apply decoupage glue once again on the coaster as a sealant & to have a glazed look

The vintage themed decoupage coaster is ready. Choose from the wide variety of Itsy Bitsy decoupage sheets & wooden blanks and give wings to your imagination. Let us know what you thought of this tutorial. :-) :-)


Link to supplies :

MDF/Wooden blank - http://www.itsybitsy.in/store/decoupage/mdf-blank/decorable-coaster-made-of-mdf-square-shape-4-inch-1pc-ib
Decoupage Paper - http://www.itsybitsy.in/store/decoupage/decoupage-paper
Decoupage glue - http://www.itsybitsy.in/store/index.php?main_page=advanced_search_result&search_in_description=0&keyword=71504
Pigment Ink - http://www.itsybitsy.in/store/index.php?main_page=advanced_search_result&search_in_description=0&keyword=Pigment+Ink
Foam brush - http://www.itsybitsy.in/store/index.php?main_page=advanced_search_result&search_in_description=0&keyword=Foam+brush
Sponge - http://www.itsybitsy.in/store/party/kids/gifting/angry-bird-shape-eraser-4pcs-blister-ib
Scissor - http://www.itsybitsy.in/store/index.php?main_page=advanced_search_result&search_in_description=0&keyword=scissor


Tuesday, January 19, 2016

Republic Day Chakra

As the republic day comes closer, let us ignite the patriotic spirit & create a lovely chakra.

It is an easy DIY for kids too. You can attach a magnet and stick it onto the fridge or window to showcase your love for the country. You can also stick a double sided tape and hang it.

Materials required:
·         Punch paper: Orange-1, white- 2 and green- 1.
·         Scale
·         Cutter
·         Glue
·         Magnet or double sided tape
To make small decoration you can use A4 sheet but to make large decoration glue two A4 sheets

Method:

Step 1 - Place the scale on the paper and score all the punch paper using the blunt edge of the cutter. Let the distance between the scored lines be equal. It is best to use the width of the scale to score
Step 2: Score all the paper as shown
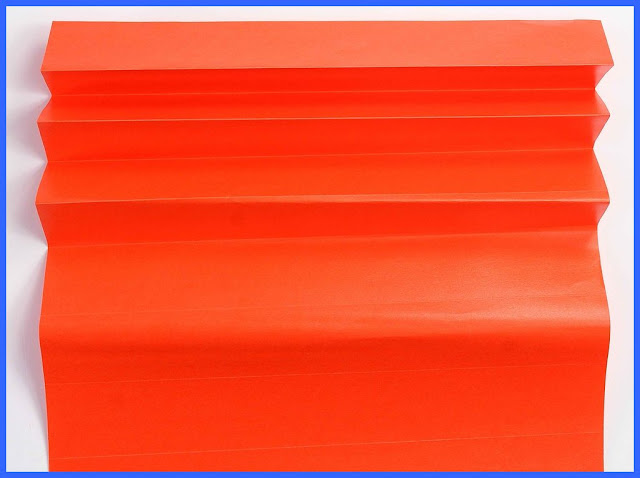
Step 3: Fold on the scored lines, as shown
Step 4: Fold all the paper along the scored lines, as shown

Step 5: Hold the folded paper tightly and cut slanting to make pointed tip, as shown
Step 6: Glue one side of the entire folded paper, as shown
Step 7: Stick it to the white folded paper
Step 8: Glue all the folded papers to one another, as shown. Let them be in the order: white, orange, white and green
Step 9: Glue on the flat edges of the paper. Glue the green folded paper, as shown
Step 10: Turn the papers to make a circle and stick the green paper to the white paper to complete the circle
Glue the magnet to the center of the flag or you can attach a double sided tape
The flag is read. Let us enhance the spirit of integrity and brotherhood by making and gifting these in schools, colleges and offices.

Link to supplies - 
Scale:  IBPA60016
Cutter: ODST71358
Glue: IBAD13255
Magnet: IBCR13581
Double sided tape: IBAD13162